Seminar 5: ResNet
이번 포스트는 KellerJordan/ResNet-PyTorch-CIFAR10와 kuangliu/pytorch-cifar의 코드를 활용해 재구성 했음을 미리 밝힙니다 🙏
저번 세미나에서 ResNet을 포함한 CNN Architecture에 대해 살펴보았다. 이번에는 ResNet을 직접 PyTorch 코드로 구현해보자! 🙌
MNIST CNN
class MNISTCNN(nn.Module):
  def __init__(self):
    super().__init__()
    self.conv1 = nn.Conv2d(1, 6, 5)
    self.conv2 = nn.Conv2d(6, 16, 5)
    self.fc1 = nn.Linear(16 * 4 * 4, 120)
    self.fc2 = nn.Linear(120, 84)
    self.fc3 = nn.Linear(84, 10)

  def forward(self, x):
    x = F.relu(self.conv1(x))
    x = F.max_pool2d(x, 2)
    x = F.relu(self.conv2(x))
    x = F.max_pool2d(x, 2)

    x = torch.flatten(x, 1)
    x = F.relu(self.fc1(x))
    x = F.relu(self.fc2(x))
    x = self.fc3(x)
    return x
우리는 MNIST 데이터셋으로 숫자를 분류하는 CNN 모델까지 구현해봤다. 또 HW3로 CIFIAR10 데이터셋을 쓰는 Image Classifier를 구현했다. 이번에 구현하는 ResNet은 CIFIAR100을 기준으로 이미지를 분류하는 모델이다.
ResBlock Overview

제일 먼저 ResNet의 단위가 될 ResBlock의 코드를 살펴보자.
class ResBlock(nn.Module):
  def __init__(self, in_channels, out_channels, stride=1):
    super(ResBlock, self).__init__()

    self.conv1 = nn.Conv2d(in_channels, out_channels, kernel_size=3, stride=stride, padding=1)
    self.bn1 = nn.BatchNorm2d(out_channels)
    self.relu1 = nn.ReLU(inplace=True) # same as F.relu()
    self.conv2 = nn.Conv2d(out_channels, out_channels, kernel_size=3, stride=1, padding=1)
    self.bn2 = nn.BatchNorm2d(out_channels)
    self.relu2 = nn.ReLU(inplace=True)

  def forward(self, x):
    ...
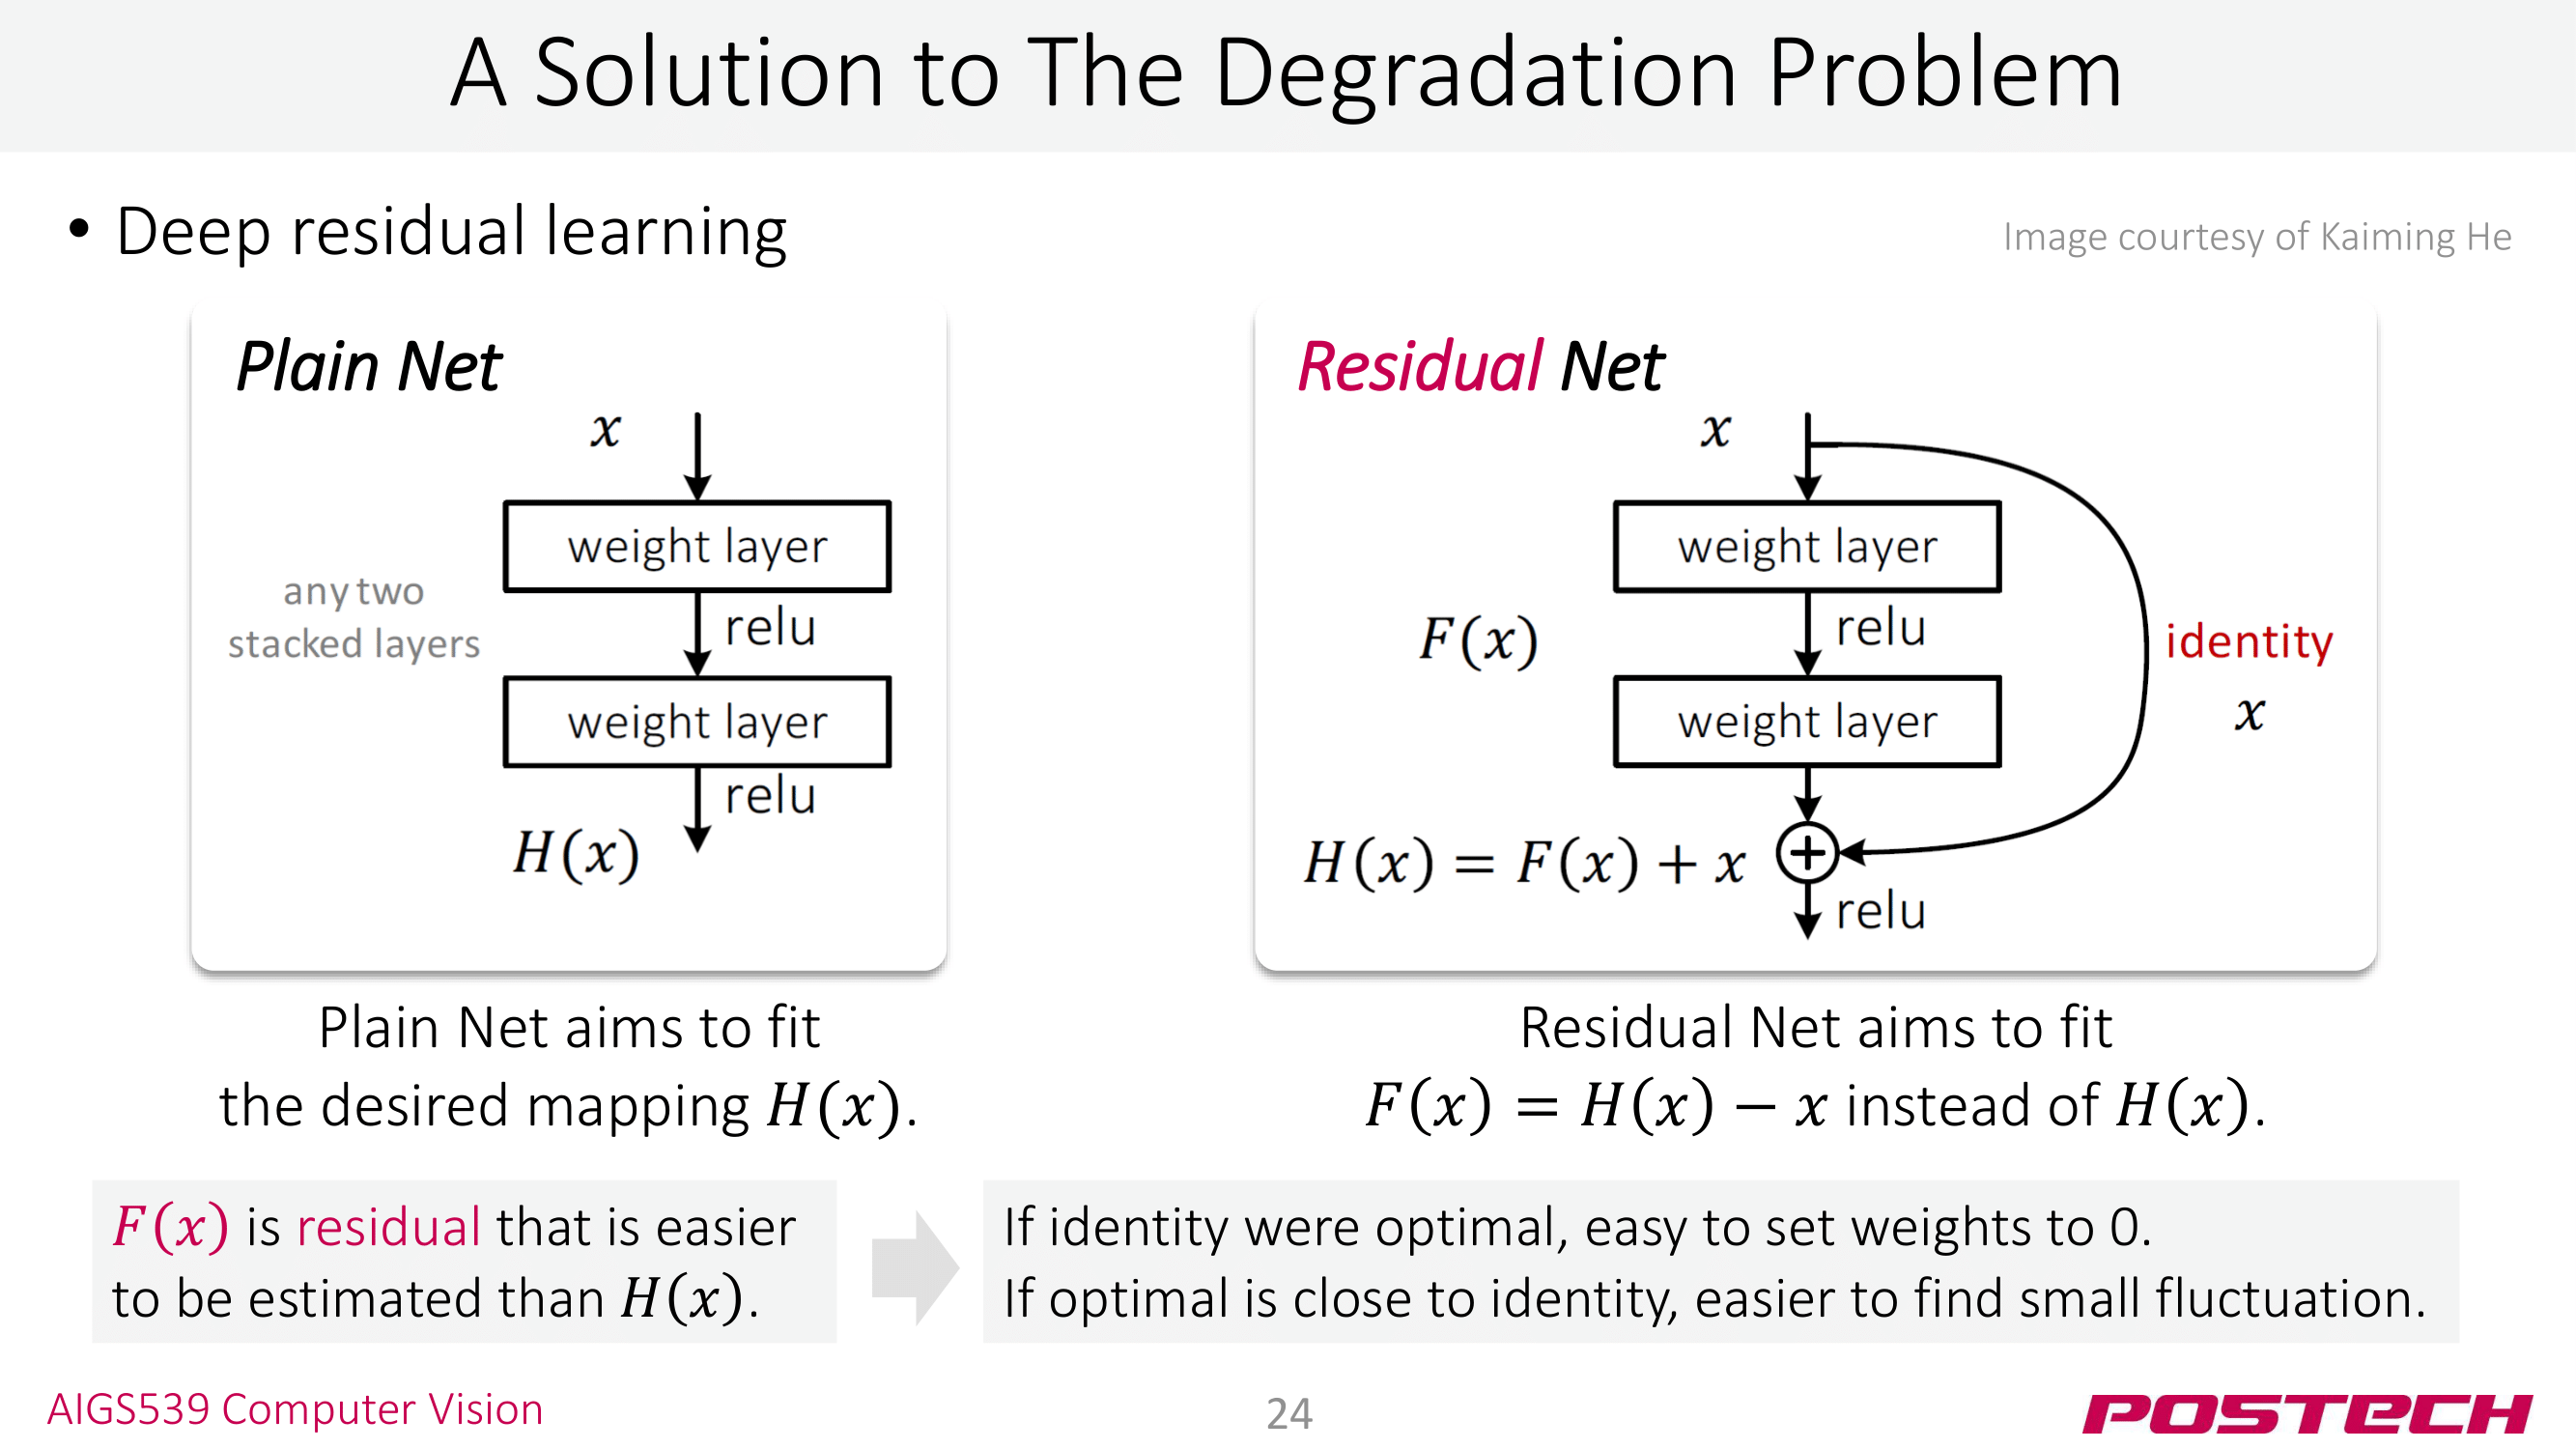
먼저 ResBlock의 구조에 맞게 필요한 layer를 선언한다. 위의 사진을 바탕으로 2개의 Conv layer와 2개의 ReLU, 그리고 conv 직후의 BN을 선언한다.
class ResBlock(nn.Module):
  def __init__(self, in_channels, out_channels, stride=1):
    ...

  def forward(self, x):
    residual = x

    out = self.conv1(x)
    out = self.bn1(out)
    out = self.relu1(out)

    out = self.conv2(out)
    out = self.bn2(out)

    out += residual # residual here!
    out = self.relu2(out)
    return out
ResNet 모델의 핵심인 Residual flow가
  residual = x
  ...
  out += residual
의 형태로 구현되었다! 코드로 보면 += 하나로 정말 간단하게 Residual flow를 구현할 수 있다! 🙌
ResNet Overview

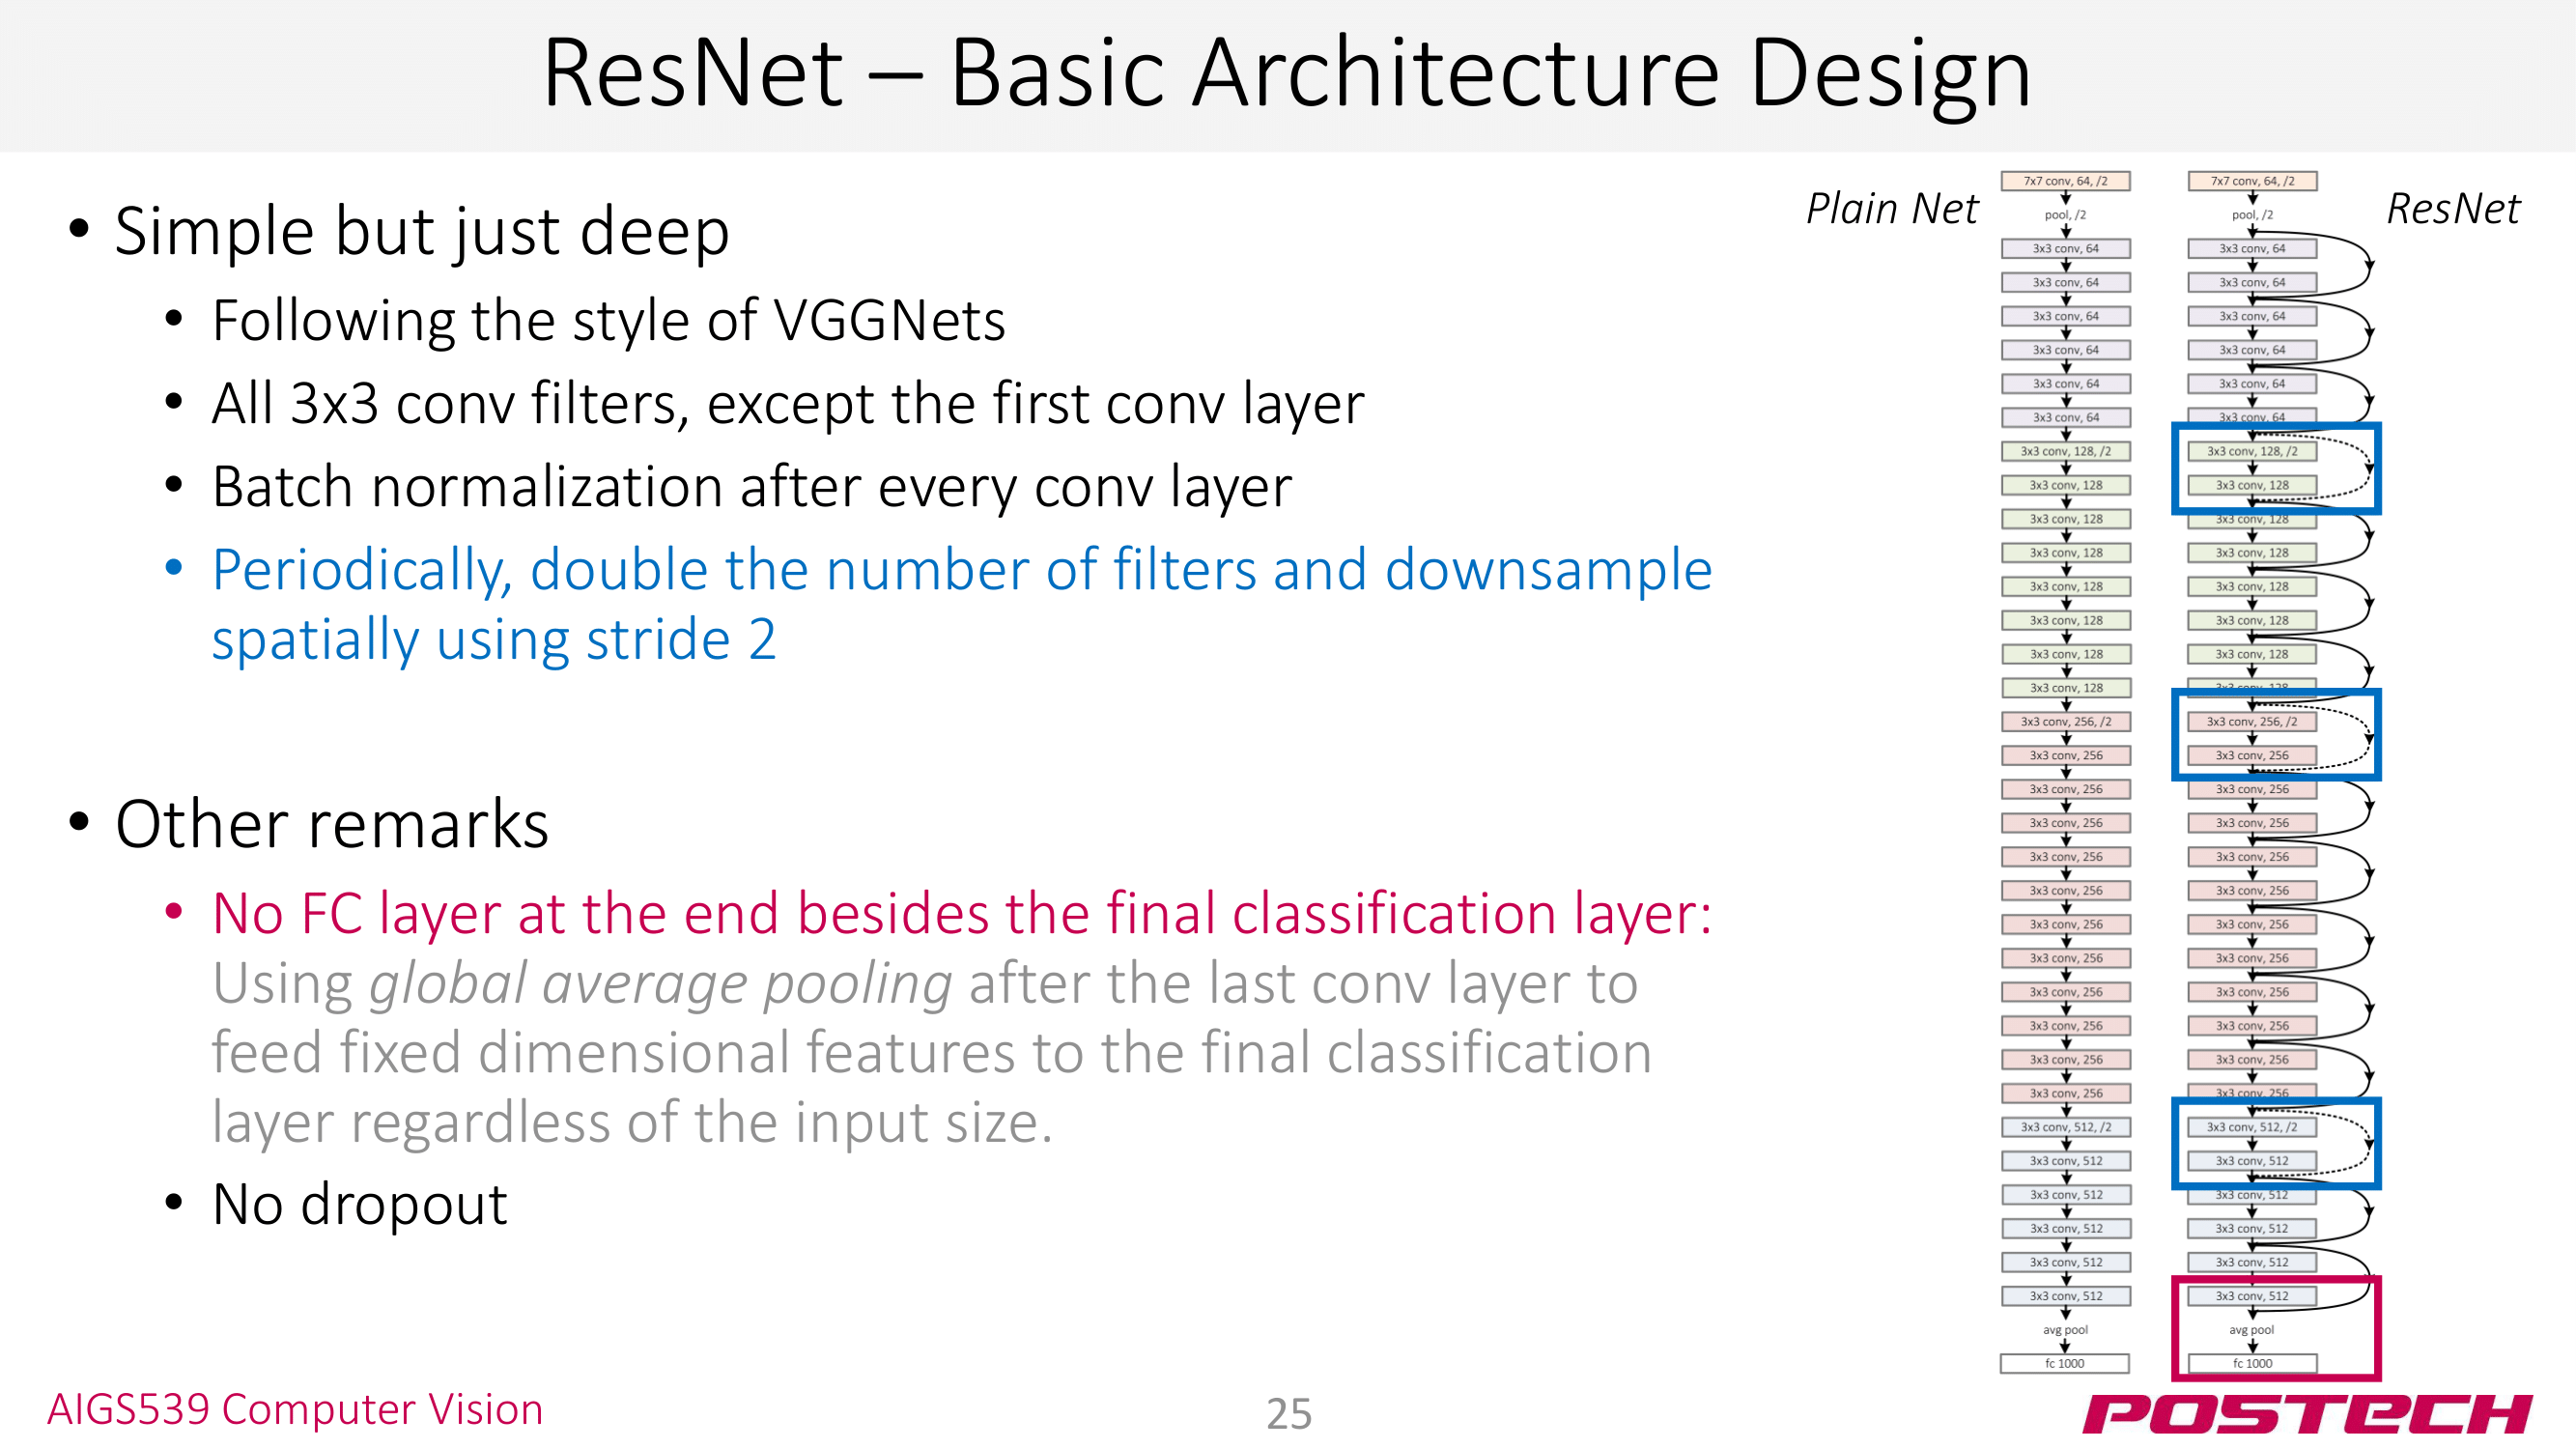
ResNet 코드에서 배울 점은 이 ResBlock의 Residual Flow 뿐이 아니다. ResNet 코드에서 깊은 모델을 만들 때 쓰는 몇가지 트릭들을 볼 수 있다 👀
# 일단 ResNet의 전체 코드를 보자!
class ResNet(nn.Module):
  def __init__(self, n=7):
    super(ResNet, self).__init__()
    self.conv1 = nn.Conv2d(3, 16, kernel_size=3, stride=1, padding=1)
    self.norm1 = nn.BatchNorm2d(16)
    self.relu1 = nn.ReLU(inplace=True)
    self.layer1 = self._make_layer(n, in_channels=16, out_channels=16, stride=1)
    self.layer2 = self._make_layer(n, in_channels=16, out_channels=32, stride=2)
    self.layer3 = self._make_layer(n, in_channels=32, out_channels=64, stride=2)
    self.layer4 = self._make_layer(n, in_channels=64, out_channels=128, stride=2)
    self.avgpool = nn.AvgPool2d(8)
    self.linear = nn.Linear(128, 10)

  def _make_layer(self, num_layers, in_channels, out_channels, stride):
    layer_list = [ResBlock(in_channels, out_channels, stride)]
    for _ in range(num_layers):
      layer_list.append(ResBlock(out_channels, out_channels))
    return nn.Sequential(*layer_list)

  def forward(self, x):
    x = self.conv1(x)
    x = self.norm1(x)
    x = self.relu1(x)

    x = self.layer1(x)
    x = self.layer2(x)
    x = self.layer3(x)
    x = self.layer4(x)

    x = self.avgpool(x)
    x = x.view(x.size(0), -1)
    x = self.linear(x)
    return x
ResNet은 layer가 많으면 100개를 넘어가기 때문에 그 많은 layer 전부를 __init__()에 선언하는 게 힘들다. 그래서 _make_layer() 함수로 연속되는 몇개의 layer를 블록으로 한번에 선언할 수 있도록 했다.
  def _make_layer(self, num_layers, in_channels, out_channels, stride):
    layer_list = [ResBlock(in_channels, out_channels, stride)]
    for _ in range(num_layers):
      layer_list.append(ResBlock(out_channels, out_channels, stride))
    return nn.Sequential(*layer_list)
-
참고로 python의
class에서는 C++/Java의private키워드가 없다. 그러나 함수와 변수 앞에 언더바_를 붙여주면 private 변수다 라는 암묵적인 규칙이 있다 👏_make_layer()의 앞의_는 그런 의미다. -
pytorch에는 여러 개의 layer를 묶어주는
nn.Sequential()라는 객체가 있다.list타입을 입력으로 받는 이 녀석을 사용해 하나의 layer 블록을 만들 수 있다! [torch: nn.Sequantial] 앞으로도 꽤 자주 쓸 녀석이니 익숙해지면 좋다 🙌 -
_make_layer()에서는for문을 이용해 연속된ResBlock을 생성한다. 몇개의ResBlock을 사용할지는num_layers를 통해 조절할 수 있다. -
for문에서도 언더바_가 사용되었다. 따로 변수를 지정하고 싶지 않을 떄 이렇게 언더바_를 쓰기도 한다. python으로 코딩 하다보면 꽤 자주 쓰게 된다 👍 python 언더바 (_) 사용하기
Let’s Serve!
자! 여기까지 짜면 ResNet의 구현은 끝났다!! 너무 쉬운데? torchvision 데이터셋으로 모델 성능을 한번 확인해보자. [torchvision.datasets]
ResNet w/ CIFAR10
serminar3: MNIST CNN 때와 마찬가지로 torchvision 데이터셋을 활용한다. 코드 맥락은 seminar3의 MNIST 학습과 거의 비슷하다.
USE_CUDA = True

# prepare dataset
transform = transforms.Compose([transforms.ToTensor(), transforms.Normalize(0, 1)])
trainset = torchvision.datasets.CIFAR10(root='./data', train=True,
                                        download=True, transform=transform)
testset = torchvision.datasets.CIFAR10(root='./data', train=False,
                                       download=True, transform=transform)

myResNet = ResNet(n=5)
if USE_CUDA:
  myResNet = myResNet.cuda()

# prepare dataLoader
BATCH_SIZE = 128
train_dl = DataLoader(trainset, batch_size=BATCH_SIZE, shuffle=True)
test_dl = DataLoader(testset, batch_size=BATCH_SIZE, shuffle=False)

# prepare optimizer
criterion = nn.CrossEntropyLoss()
optimizer = optim.SGD(myResNet.parameters(), lr=1e-4, momentum=0.9)

# Train Model!
total_tic = time.time()
# Train Model!
MAX_EPOCH = 21
for epoch in range(MAX_EPOCH):
  tic = time.time()

  # train
  total_train_loss = 0
  total_train_correct = 0
  for X, y in train_dl:
    optimizer.zero_grad()
    if USE_CUDA:
      X = X.cuda()
      y = y.cuda()

    y_pred = myResNet(X)

    value, index_pred = torch.max(y_pred.data, 1)
    total_train_correct += (index_pred == y).sum().item()

    loss = criterion(y_pred, y)
    total_train_loss += loss.item()

    loss.backward()
    optimizer.step()

  # test
  total_test_loss = 0
  total_test_correct = 0
  with torch.no_grad():
    for X, y in test_dl:
      if USE_CUDA:
        X = X.cuda()
        y = y.cuda()

      y_pred = myResNet(X)

      value, index_pred = torch.max(y_pred.data, 1)
      total_test_correct += (index_pred == y).sum().item()

      loss = criterion(y_pred, y)
      total_test_loss += loss.item()

  toc = time.time()
  print(f'===== {epoch} ====')
  print(f'elaps: {toc - tic:.1f} sec')
  print(f'[train] loss: {total_train_loss / len(trainset):.4f}, '
        f'acc: {total_train_correct / len(trainset):.3f}')
  print(f'[test] loss: {total_test_loss / len(testset):.4f}, '
        f'acc: {total_test_correct / len(testset):.3f}')
total_toc = time.time()

print(f'[Total Run]: {total_toc - total_tic:.1f} sec')
데이터셋만 CIFAR10으로 바꿔주면 될 것 같지만 아래의 에러를 얻는다. 😒
The size of tensor a (16) must match the size of tensor b (32) at non-singleton dimension 3
대충 텐서 크기가 서로 맞지 않아서 연산이 불가능하다는 얘기인데, ResBlock의
  ...
  def forward(self, x):
    ...
    out += self.projection(residual) # residual here!
요 부분이 문제다. 디버그를 해보면 오류가 in_channels != out_channels인 상황에서 일어난다. layer2, layer3의 16 -> 32, 32 -> 64에서 말이다. 이 경우에는 residual과 out이 각각 16 채널, 32 채널이기 때문에 연산이 불가능한 것이다.
사실 처음에 구현한 ResBlock은 완전한 형태가 아니라서 몇가지를 더 구현 해줘야 한다. 이를 위해 Identity 매핑을 하는 IdentityPadding이라는 커스텀 모듈을 만들어주자.
class IdentityPadding(nn.Module):
  def __init__(self, in_channels, out_channels, stride):
    super(IdentityPadding, self).__init__()
    self.identity = nn.MaxPool2d(1, stride=stride) # 해설 참조
    self.num_zero_pads = out_channels - in_channels

  def forward(self, x):
    out = F.pad(x, (0, 0, 0, 0, 0, self.num_zero_pads), value=0.0)
    out = self.identity(out)
    return out
이 모듈은 out_channels이 in_channels 보다 크다면 여분의 채널을 zero로 padding 해주는 매핑 layer다. 코드를 살펴보면,
self.identity = nn.MaxPool2d(1, stride=stride)
요 부분은 사실 stride=1라면 이 녀석이 없어도 된다. stride!=1인 경우를 커버하기 위해 nn.MaxPool2d(1, stride)를 쓴 것
  if self.num_zero_pads > 0:
      out = F.pad(x, (0, 0, 0, 0, 0, self.num_zero_pads), value=0.0)
요 부분은 F.pad() 함수를 먼저 알아야 한다. [torch: F.pad()] F.pad()는 패딩할 위치를 pad라는 인자를 결정한다. 위와 같이 6개의 인자를 사용한다면 아래와 같은 의미를 갖는다.
(padding_left, padding_right, padding_top, padding_bottom, padding_front, padding_back)
= (0, 0, 0, 0, 0, self.num_zero_pads)
그래서 우리의 경우는 가장 마지막 채널을 zero padding 하는 게 된다.
F.pad() 대신 다른 방식으로 이를 구현할 수도 있을 것이다. 직접 self.num_zero_pads 만큼의 채널을 갖는 동일한 사이즈의 텐서를 생성한 후 torch.stack() 함수로 직접 붙여버릴 수도 있을 것이다. 단, 이렇게 할 수도 있고, 저렇게 할 수도 있다는 거지 문제없이 잘 동작하는 방식으로 구현하면 된다 😉
IdentityPadding을 ResBlock에 적용하면 아래와 같다.
class ResBlock(nn.Module):
  def __init__(self, in_channels, out_channels, stride=1):
    super(ResBlock, self).__init__()
    ...
    self.projection = IdentityPadding(in_channels, out_channels, stride)

  def forward(self, x):
    residual = x
    ...
    out += self.projection(residual) # residual here!
    out = self.relu2(out)
    return out
자! 이대로 학습을 해보자! 학습은 KellerJordan/ResNet-PyTorch-CIFAR10의 hyper-parameter를 그대로 따랐다 🙏 원래는 parameter search를 해서 직접 찾아야 한다
- num_of_resBlock = 5
- batch_size = 128
- lr = 0.1
- weight_deacy = 1e-4 (L2 regularization)
# prepare dataLoader
BATCH_SIZE = 128
train_dl = DataLoader(trainset, batch_size=BATCH_SIZE, shuffle=True)
test_dl = DataLoader(testset, batch_size=BATCH_SIZE, shuffle=False)

# prepare optimizer
criterion = nn.CrossEntropyLoss()
optimizer = optim.SGD(myResNet.parameters(), lr=0.1, momentum=0.9, weight_decay=1e-4)
그런데 잠깐! 실제 학습을 하기 전에 기존 코드를 좀 다듬고 가겠다 👏 이제는 대충 train과 test가 내부적으로 어떻게 돌아가는지 익숙하니 둘을 함수로 분리하겠다.
def train_model(train_dl, model, criterion, optimizer):
  total_train_loss = 0
  total_train_correct = 0
  total_train_samples = 0

  for X, y in train_dl:
    optimizer.zero_grad()
    if USE_CUDA:
      X = X.cuda()
      y = y.cuda()

    y_pred = model(X)

    value, index_pred = torch.max(y_pred.data, 1)
    total_train_correct += (index_pred == y).sum().item()
    total_train_samples += index_pred.size(0) # add batch size

    loss = criterion(y_pred, y)
    total_train_loss += loss.item()

    loss.backward()
    optimizer.step()

  train_loss = total_train_loss / total_train_samples
  train_acc = total_train_correct / total_train_samples
  return train_loss, train_acc

def test_model(test_dl, model, criterion):
  total_test_loss = 0
  total_test_correct = 0
  total_test_samples = 0

  with torch.no_grad():
    for X, y in test_dl:
      if USE_CUDA:
        X = X.cuda()
        y = y.cuda()

      y_pred = model(X)

      value, index_pred = torch.max(y_pred.data, 1)
      total_test_correct += (index_pred == y).sum().item()
      total_test_samples += index_pred.size(0) # add batch size

      loss = criterion(y_pred, y)
      total_test_loss += loss.item()

  test_loss = total_test_loss / total_test_samples
  test_acc = total_test_correct / total_test_samples
  return test_loss, test_acc
또, 이제는 matplotlib으로 플롯(plot)을 만들어 학습 결과를 살펴보겠다.
import matplotlib.pyplot as plt

def plot_acc(train_acc_list, test_acc_list, max_epoch, stride=1):
  epochs = range(0, max_epoch, stride)
  plt.plot(epochs, train_acc_list, label="Train Acc")
  plt.plot(epochs, test_acc_list, label="Test Acc")
  plt.title("Accuracy Graph")
  plt.xlabel("epochs")
  plt.ylabel("Accuracy")
  plt.legend()
  plt.show()
이제 정말로 학습시켜보자!
# Train Model!
total_tic = time.time()
MAX_EPOCH = 51
train_acc_list = []
test_acc_list = []
for epoch in range(MAX_EPOCH):
  tic = time.time()

  # train
  train_loss, train_acc = train_model(train_dl, myResNet, criterion, optimizer)
  train_acc_list.append(train_acc)

  # test
  test_loss, test_acc = test_model(test_dl, myResNet, criterion)
  test_acc_list.append(test_acc)

  if epoch % 5 == 0:
    print(f'===== epoch: {epoch} ====')
    print(f'[train] loss: {train_loss:.4f}, '
          f'acc: {train_acc:.3f}')
    print(f'[test] loss: {test_loss:.4f}, '
          f'acc: {test_acc:.3f}')

    toc = time.time()
    print(f'elaps: {toc - tic:.1f} sec')
total_toc = time.time()

print(f'[Total Run]: {total_toc - total_tic:.1f} sec')
plot_acc(train_acc_list, test_acc_list, MAX_EPOCH, 1)
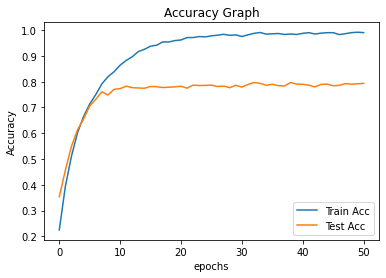
결과를 보면 뒤로 갈수록 train ACC는 높아지는데, test ACC는 정체되거나 줄어드는 걸 볼 수 있다. overfitting! 사실 본래 이미지 데이터셋을 학습 시킬 땐 Crop, Flip, Rotate 등으로 Data Augmentation해서 overfitting을 막는 방법도 있다. 이번 코드에서는 별도의 Augmentation을 안 했으니 어느 정도의 overfitting이 생길 수 있다.

ResNet w/ CIFAR100
이번 세미나 포스트가 늦어지게 된 주범이다 😒 생각보다 논문의 퍼포먼스 만큼을 재현하는게 어려워서 본인은 중간에 포기 했다 😢 논문 그대로 재현하는게 실력 향상에 정말 도움이 많이 된다. 컴퓨터 비전 쪽으로 진로를 생각하고 있다면 한번 쯤 CIFAR100 데이터셋으로 논문의 퍼포먼스를 재현해보는 걸 추천한다 👍
나중에 중간 텀 프로젝트로 낼까 고민 중이다 🤔
Refactoring More!
PyTorch의 nn.Model 모델에는 model.train()과 model.eval()라는 함수가 있다. 각각 모델의 grad 옵션을 켜고 끄는 함수이다. 그래서 with torch.no_grad() 블록 없이 아래와 같이 코드를 짤 수 있다!
def train_model(train_dl, model, criterion, optimizer):
  ...
  model.train() # 이게 추가되었다!
  for X, y in train_dl:
    ...

def test_model(eval_dl, model, criterion):
  ...
  model.eval() # with torch.no_grad() 대신 이게 추가되었다!
  for X, y in test_dl:
    ...
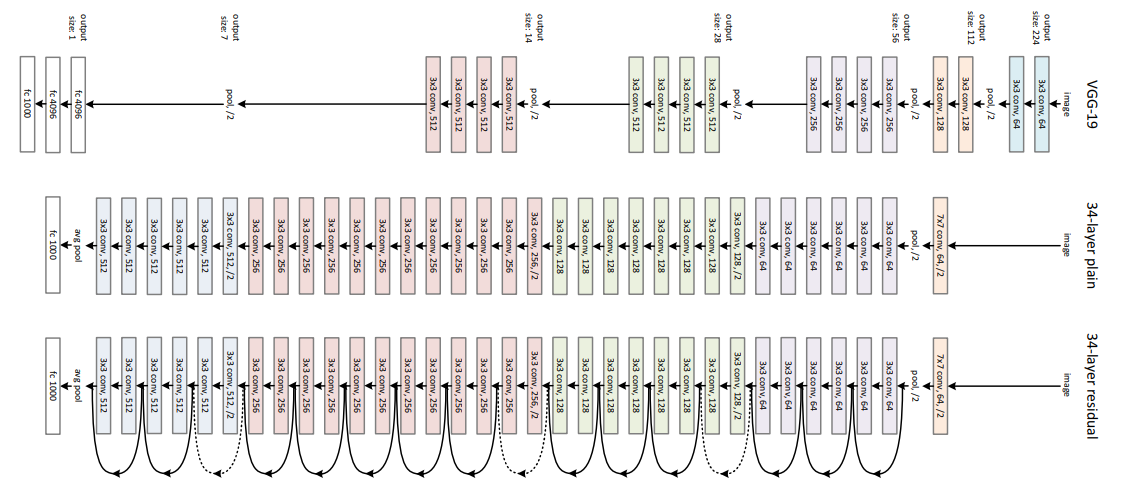
기존 ResNet에는 사실 각 레이어 블록 마다 존재하는 conv의 수가 다르다. 그래서 코드를 수정하면…
# 일단 ResNet의 전체 구조를 보자!
class ResNet(nn.Module):
  def __init__(self, num_layers: list):
    super(ResNet, self).__init__()
    ...
    self.layer1 = self._make_layer(num_layers[0], in_channels=16, out_channels=16, stride=1)
    self.layer2 = self._make_layer(num_layers[1], in_channels=16, out_channels=32, stride=2)
    self.layer3 = self._make_layer(num_layers[2], in_channels=32, out_channels=64, stride=2)
    self.layer4 = self._make_layer(num_layers[3], in_channels=64, out_channels=128, stride=2)
    ...
또, 매번 레이어 수를 직접 수정하지 않고 함수화 해서 쓰는 것도 좋은 방법이다. 예를 들어 아래와 같이 ResNet18, ResNet34 등을 함수로 정의해서 쓸 수 있다.
def resnet18():
    return ResNet([2, 2, 2, 2])

def resnet34():
    return ResNet([3, 4, 6, 3])
맺음말
이번 세미나에서는 ResNet을 실제 코드로 구현해보았다. 논문과 세미나 자료만으로는 쉽게 이해하기 어려웠던 ResNet이 코드 구현으로는 out += residual로 정말 간단하게 구현되는게 정말 아름답다.
사실 이번 세미나에서 구현한 ResNet은 실제 논문의 것을 100% 재현한 것이 아니다. 레이어 블록의 채널 수도 다르고, weight initialization이나 BottleneckBlock도 구현하지 않았다!
물론 논문의 모델을 직접 구현해보면 이론도 잘 이해되고 실력도 많이 늘지만, pytorch에서는 거의 대부분의 모델이 구현되어 있다 🙌 [pytorch - RESNET] 그래서 때로는 잘 구현된 모델을 가져다가 써야 할 수도 있다.
다음 세미나부터 NLP를 주제로 다양한 모델과 테크닉들을 살펴보자 👏
