Seminar 9: seq2seq & Attention
이번 포스트에서는 인코더-디코더 모델인 <seq2seq> 모델과 디코더에서 입력 데이터를 한번더 참고하는 방식인 <attention> 모델에 대해 살펴본다.
** 이번 세미나는 『PyTorch로 시작하는 딥러닝 입문 (유원준)』의 위키독스 페이지를 활용 했음을 밝힙니다.
- seq2seq
- teaching force
- Attention
- dot attention
seq2seq

<seq2seq>는 RNN 모델 구조 중 ManyToMany에 해당하는 모델입니다. 시퀀스를 입력으로 받아 다른 도메인의 시퀀스를 변환해 출력합니다. NLP 관점에서 쉽게 얘기 하면 문장을 압력 받아 문장으로 대답하는 모델이라고 볼 수 있습니다. 예를 들어 챗봇과 같이 질문을 입력 받아 답변을 출력하거나, 기계 번역(machine translation)에서 사용할 수 있습니다. 이번 세미나에서는 “불어-영어 번역”을 수행하는 간단한 기계 번역 모델을 바탕으로 seq2seq를 살펴보겠습니다.

seq2seq는 인코더와 디코더가 함께 있는 인코더-디코더 모델입니다. 인코더-디코더 모델을 이미 알고 있다면 seq2seq를 더 쉽게 이해할 수 있을 겁니다.
인코더는 시퀀스(문장)을 입력받아 그것을 하나의 context vector로 변환합니다. 디코더는 인코더가 만든 context vector를 바탕으로 시퀀스(번역된 문장)을 생성합니다!
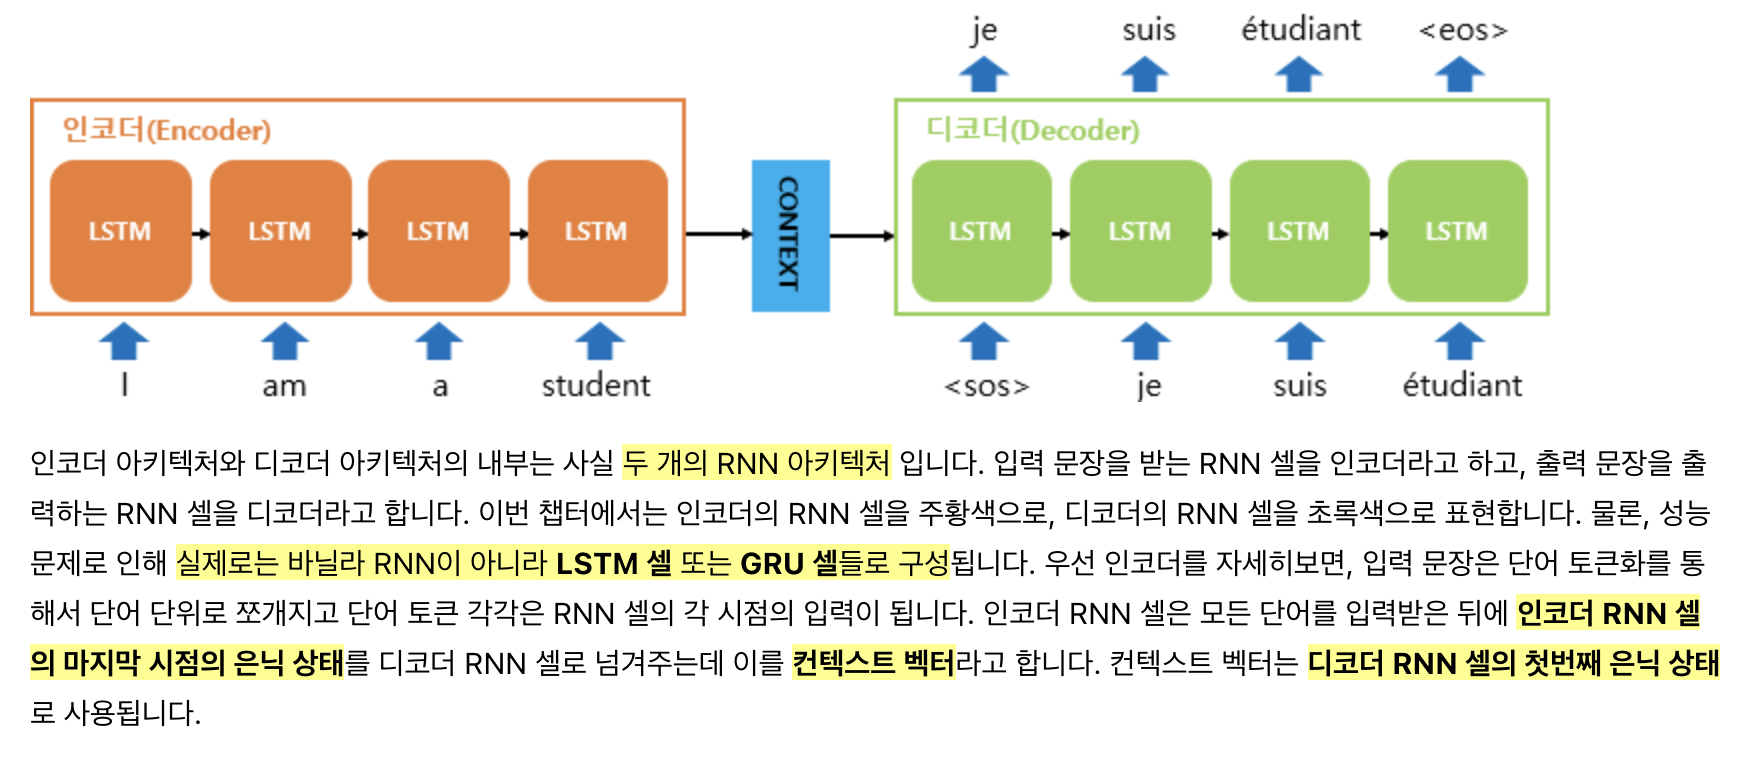
seq2seq읙 구조는 정말 간단합니다! 2개의 RNN을 붙인 형태로 문장을 입력 받는 부분이 인코더, 그리고 출력 부분이 디코더가 됩니다. context vector는 인코더의 마지막 hidden state로 디코더는 이것을 초기 hidden state 값으로 사용해 출력 시퀀스를 생성합니다.
이번 세미나에서는 기계 번역을 수행하므로 입력 문장은 단어 수준으로 쪼개져 입력 됩니다. 단어를 RNN 셀의 입력으로 받는 방법은 직전의 seminar8: Word Embedding에서 다뤘습니다!
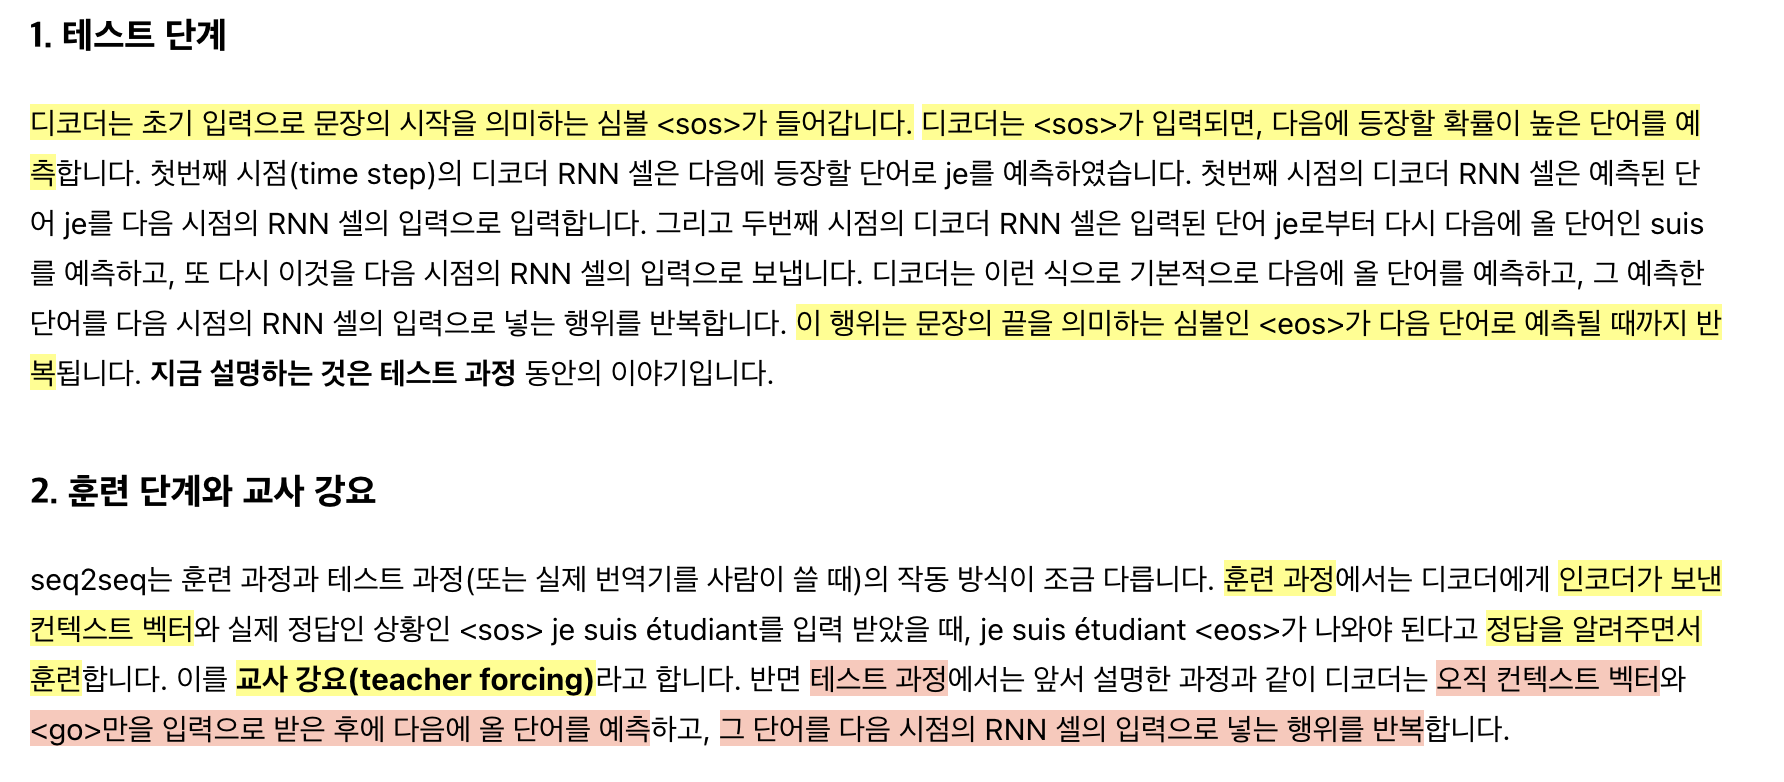
이번에는 seq2seq의 학습과 테스트 과정에 대해 살펴봅시다. 인코더와 디코더를 분리해서 살펴보면…
인코더는 context vector를 만드는 역할을 하고, 또 입력 문장이 그대로 있기 때문에 따로 매 스텝마다 한 단어씩 입력 문장을 넣어주기만 하면 됩니다. 인코더의 학습은 인코더가 입력 문장을 최대한 가깝게 모사하도록 학습해 적절한 context vector를 생성하도록 하는 것 입니다.
디코더의 경우는 학습과 테스트 과정이 약간 다릅니다. 디코더는 2가지를 입력으로 받는데, (1) 인코더의 context vector (2) 문장 입력 토큰 <sos> 입니다.
[테스트 과정]에서는 디코더는 매 스텝 자신이 직전에 예측한 다음 단어를 입력으로 사용합니다. 그러나 [학습 과정]에서는 이렇게 모델이 예측한 다음 단어를 입력으로 사용하면, 학습 초반에 디코더가 제대로 학습하지 못한 상태의 출력이 영향을 주게 됩니다. 이를 해결하기 위한 기법이 <교사 강요(Teaching Force)>로 [학습 과정]에서 디코더의 매 스텝에 정답 값을 알려주며 학습하는 기법입니다. 이후에 코드를 통해서도 살펴보도록 하겠습니다.
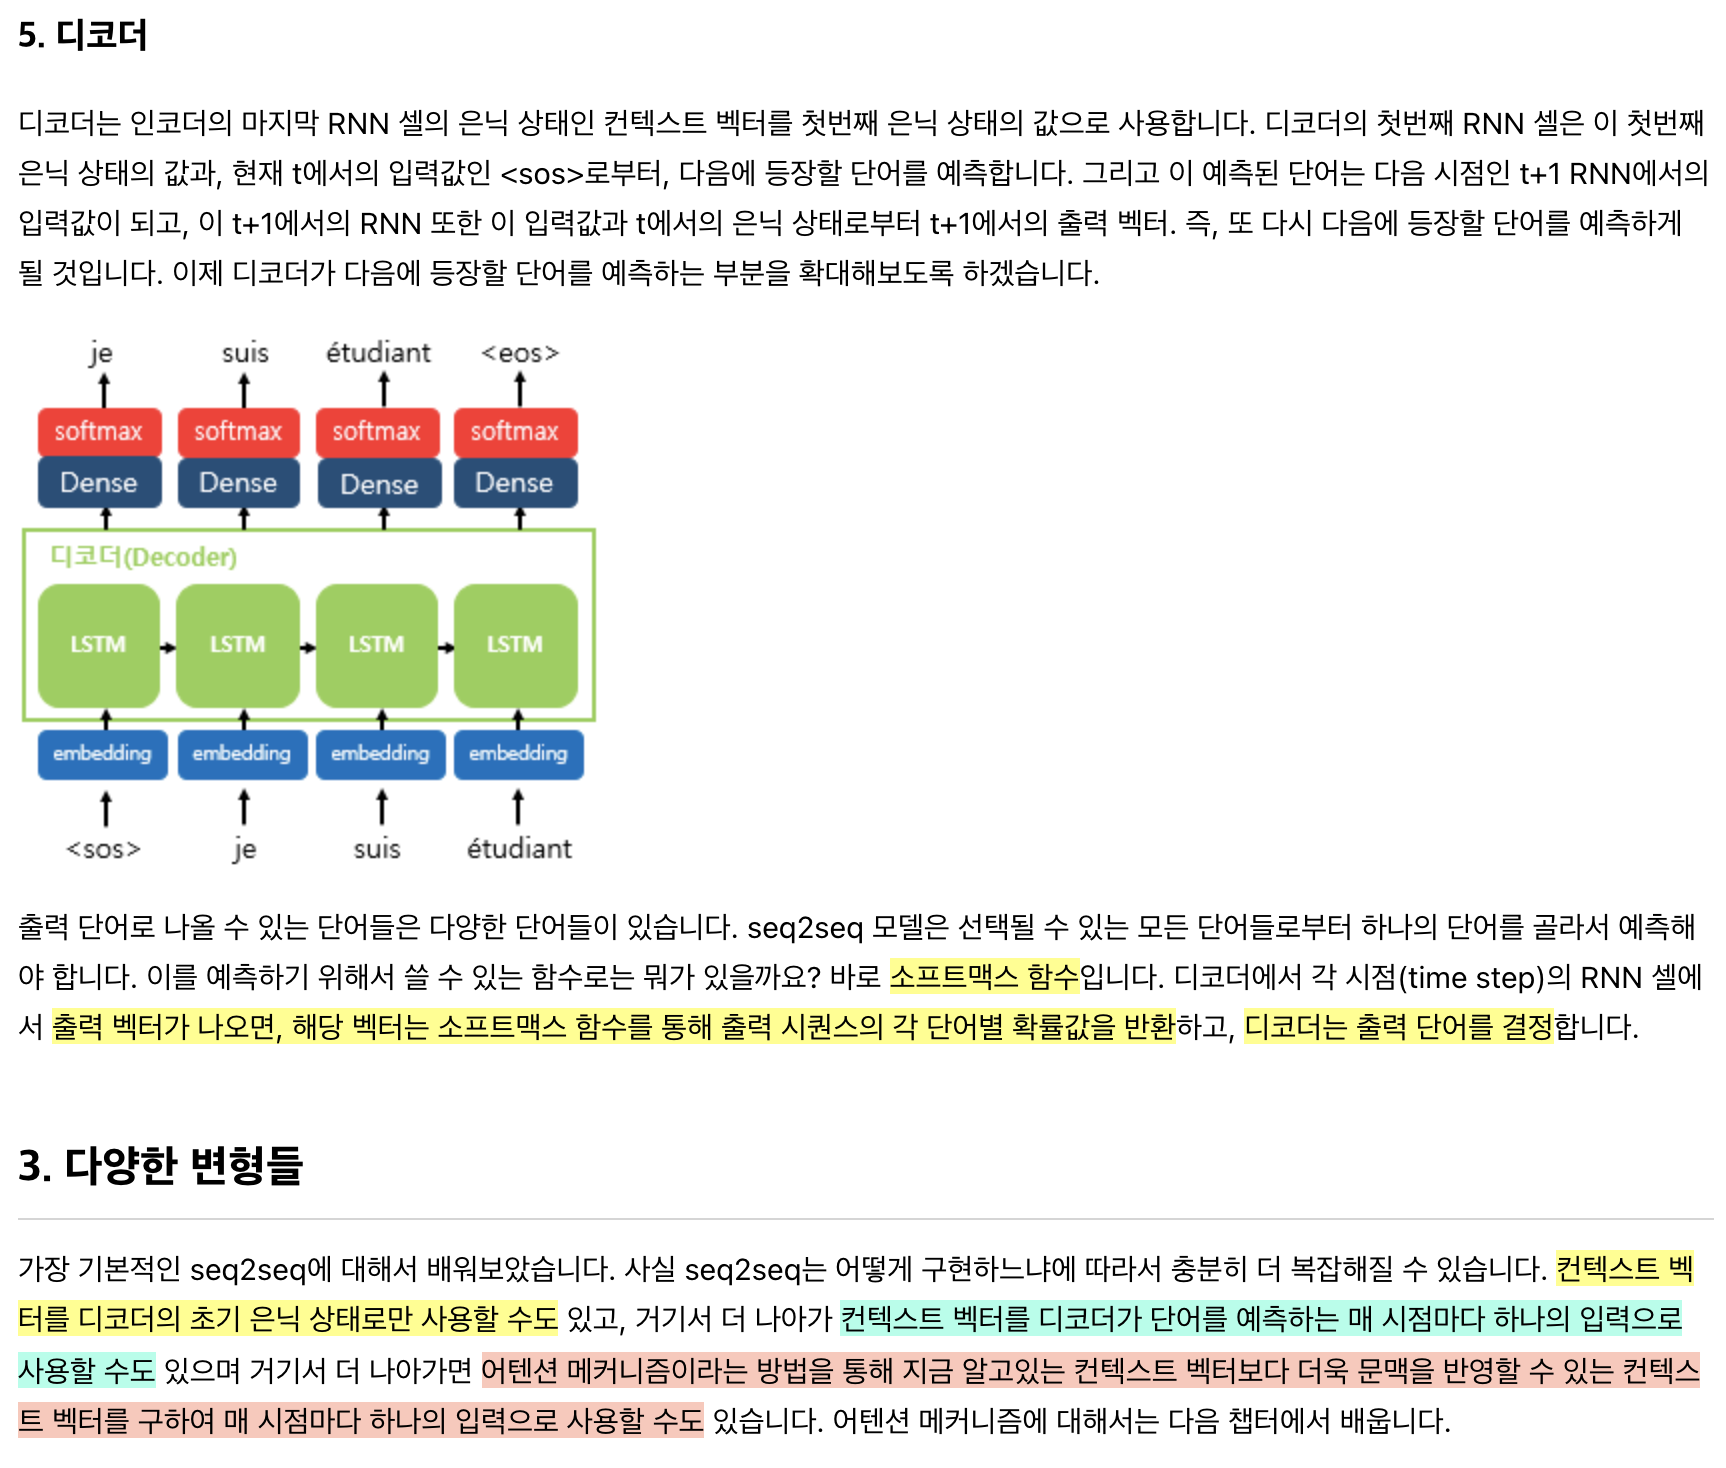
인코더와 디코더 모두 WordRNN이기 때문에 출력 단에 Softmax 함수를 붙여 사용합니다.
실습: seq2seq 기계 번역 (불어 -> 영어)
불어를 영어로 번역하는 기계 번역 PyTorch 모델을 seq2seq로 구현해봅시다. PyTroch 공식 튜토리얼의 “기초부터 시작하는 NLP: SEQUENCE TO SEQUENCE 네트워크와 ATTENTION을 이용한 번역” 문서를 참고했지만, 세미나에 맞게 모델와 코드를 번형 했음을 미리 밝힙니다.
세미나에서 사용한 코드는 세미나 GitHub 레포에서 확인할 수 있습니다. [link]
데이터셋
먼저 번역을 위해 (불어, 영어) 쌍의 데이터셋을 준비합시다.
!wget https://download.pytorch.org/tutorial/data.zip
!unzip data.zip
!head data/eng-fra.txt
-------------------------
Go.	Va !
Run!	Cours !
Run!	Courez !
Wow!	Ça alors !
Fire!	Au feu !
Help!	À l'aide !
Jump.	Saute.
Stop!	Ça suffit !
Stop!	Stop !
Stop!	Arrête-toi !
총 데이터 갯수를 세어보면 13만 개 쯤 되는데, 자연어 데이터 전처리와 데이터 정제를 통해 데이터 갯수를 줄이도록 하겠습니다.
- 소문자, 다듬기, 알파벳이 아닌 문자 제거
- “I am”, “He is”와 같이 “주어 + be동사”로 시작하는 문장만 필터
- 입출력 문장의 양 끝에 <sos>, <eos> 토큰 삽입
from __future__ import unicode_literals, print_function, division
from io import open
import unicodedata
import string
import re

lines = pd.read_csv('data/eng-fra.txt', names=['src', 'tar'], sep='\t')
print(f'[1] {len(lines)}') # 13만개

# fra를 src, eng를 tar로 변경
lines = lines.rename(columns={'src': 'tar', 'tar': 'src'})
lines = lines.reindex(columns=['src', 'tar'])

# 유니 코드 문자열을 일반 ASCII로 변환하십시오.
# https://stackoverflow.com/a/518232/2809427
def unicodeToAscii(s):
    return ''.join(
        c for c in unicodedata.normalize('NFD', s)
        if unicodedata.category(c) != 'Mn'
    )

# 소문자, 다듬기, 그리고 문자가 아닌 문자 제거
def normalizeString(s):
    s = unicodeToAscii(s.lower().strip())
    s = re.sub(r"([.!?])", r" \1", s)
    s = re.sub(r"[^a-zA-Z.!?]+", r" ", s)
    return s

lines.src = lines.src.apply(lambda x : normalizeString(x))
lines.tar = lines.tar.apply(lambda x : normalizeString(x))

# 전체 데이터셋이 너무 많으니 "I am" 또는 "He is"와 같은 형태의 문장만 필터하여 학습
# 또, 문장에 포함된 단어의 수가 10개 이하인 문장만 학습

# rule 1
MAX_LENGTH = 6

# rule 2
eng_prefixes = (
    "i am ", "i m ", # 어퍼스트로피(')는 이미 normalize 과정에서 필터됨
    "he is", "he s ",
    "she is", "she s ",
    "you are", "you re ",
    "we are", "we re ",
    "they are", "they re "
)

filter_TF = []
for idx in lines.index:
  is_underMaxLength = len(lines.loc[idx, 'src'].split(' ')) <= MAX_LENGTH \
                and len(lines.loc[idx, 'tar'].split(' ')) <= MAX_LENGTH
  is_prefix = lines.loc[idx, 'tar'].startswith(eng_prefixes)
  filter_TF.append(is_underMaxLength and is_prefix)

lines = lines[filter_TF]
print(f'[2] {len(lines)}')

# 소스 언어의 맨뒤에 <eos>  토큰 추가
# 타겟 언어의 앞뒤로 <sos>, <eos> 토큰 추가

lines.src = lines.src.apply(lambda x : x + ' <eos>')
lines.tar = lines.tar.apply(lambda x : '<sos> '+ x + ' <eos>')
MAX_LENGTH += 2
print(lines.sample(10))
---------------------------
[1] 135842
[2] 5318
                                          src                                      tar
15558               je suis si epuise ! <eos>          <sos> i am so exhausted ! <eos>
41635                  tu es medisant . <eos>     <sos> you re being malicious . <eos>
4896                je suis desespere . <eos>              <sos> i m desperate . <eos>
11150                  tu es ponctuel . <eos>            <sos> you re punctual . <eos>
31599             tu es tres genereux . <eos>       <sos> you re very generous . <eos>
1712                        j ai faim ! <eos>                <sos> i am hungry . <eos>
5460                 ils sont fauches . <eos>              <sos> they re broke . <eos>
51978  vous etes un horrible individu . <eos>   <sos> you re a terrible person . <eos>
6496               je suis trop petit . <eos>             <sos> i am too short . <eos>
57683         vous etes fort raffinee . <eos>  <sos> you re very sophisticated . <eos>
넵! 이를 통해 13만 개의 문장을 5천 개 문장으로 줄였고, 이를 학습 데이터로 사용하겠습니다.
좀더 언어 데이터셋을 좀더 쉽게 관리할 수 있는 Lang 헬퍼 클래스를 정의하겠습니다. 이를 이후에 모델 train/eval 과정에서 활용할 예정입니다.
SOS_token = 0
EOS_token = 1

# vocab 정보를 저장하는 helper class
class Lang:
  def __init__(self, name):
    self.name = name
    self.word2index = {'<sos>': 0, '<eos>': 1}
    self.word2count = {}
    self.index2word = {0: '<sos>', 1: '<eos>'}
    self.n_words = 2

  def addSentence(self, sentence):
    for word in sentence.split(' '):
      self.addWord(word)

  def addWord(self, word):
    if word == '<sos>' or word == '<eos>': return
    if word not in self.word2index:
      self.word2index[word] = self.n_words
      self.word2count[word] = 1
      self.index2word[self.n_words] = word
      self.n_words += 1
    else:
      self.word2count[word] += 1

# Lang 인스턴스 생성
input_lang = Lang('eng')
output_lang = Lang('fra')

for idx, row in lines.iterrows():
  input_lang.addSentence(row['src'])
  output_lang.addSentence(row['tar'])

print(input_lang.n_words)
print(output_lang.n_words)
--------------------------------
2579
1573
또, 문장으로 되어 있는 현재의 입출력 데이터셋을 정수 인코딩 하는 헬퍼 함수를 정의하겠습니다.
def sentenceToTensor(lang, sentence):
  integer_encode = [lang.word2index[word] for word in sentence.split(' ')]
  return torch.LongTensor(integer_encode).to(device).view(-1, 1)

training_pairs = []
for idx, row in lines.iterrows():
  training_pairs.append((
    sentenceToTensor(input_lang, row['src']),
    sentenceToTensor(output_lang, row['tar'])
  ))

print(len(training_pairs))
print(training_pairs[0])
-------------------------
5318
(tensor([[2],
        [3],
        [4],
        [5],
        [1]], device='cuda:0'), tensor([[0],
        [2],
        [3],
        [4],
        [1]], device='cuda:0'))
seq2seq 모델 정의
class EncoderRNN(nn.Module):
  # input_size = # of words in input language
  def __init__(self, input_size, hidden_size):
    super(EncoderRNN, self).__init__()
    self.hidden_size = hidden_size # size of context vector

    self.embedding = nn.Embedding(input_size, hidden_size)
    self.gru = nn.GRU(hidden_size, hidden_size)

  def forward(self, input, hidden):
    embedded = self.embedding(input).view(1, 1, -1)
    output, hidden = self.gru(embedded, hidden)
    return output, hidden

  def initHidden(self):
    return torch.zeros(1, 1, self.hidden_size, device=device)

class DecoderRNN(nn.Module):
  # output_size = # of words in output language
  def __init__(self, output_size, hidden_size):
    super(DecoderRNN, self).__init__()
    self.hidden_size = hidden_size

    self.embedding = nn.Embedding(output_size, hidden_size)
    self.gru = nn.GRU(hidden_size, hidden_size)
    self.fc = nn.Linear(hidden_size, output_size)
    self.softmax = nn.LogSoftmax(dim = 1)

  def forward(self, input, hidden):
    output = self.embedding(input).view(1, 1, -1)
    output = F.relu(output)
    output, hidden = self.gru(output, hidden)
    output = self.fc(output[0])
    output = self.softmax(output)
    return output, hidden

  def initHidden(self):
    return torch.zeros(1, 1, self.hidden_size, device=device)
인코더와 디코더 모두 WordRNN이기 때문에 마지막 출력 단을 제외하고는 전체적인 구조는 비슷합니다. forward(...) 함수에서 input과 함께 hidden을 입력 받을 수 있게 해 context vector를 넘겨 받을 수 있게 했습니다.
모델 학습
def train(encoder, decoder, encoder_optimizer, decoder_optimizer, criterion, pair):
  loss = 0

  # encoder train
  encoder_optimizer.zero_grad()

  input_tensor = pair[0]
  input_length = input_tensor.size(0)

  encoder_hidden = encoder.initHidden()
  encoder_outputs = torch.zeros(MAX_LENGTH, encoder.hidden_size, device=device)
    # MAX_LENGTH = 10
    # encoder의 output을 기록하는 용도

  for ei in range(input_length): # iterate word one-by-one
    encoder_output, encoder_hidden = encoder(input_tensor[ei], encoder_hidden)
    encoder_outputs[ei] += encoder_output[0, 0]

  ...
인코더는 입력 문장에서 단어를 하나씩 입력 받으면 encoder_hidden을 출력합니다. 마지막 hidden state가 디코더의 hidden state로 입력 됩니다.
def train(encoder, decoder, encoder_optimizer, decoder_optimizer, criterion, pair):
  loss = 0

  # encoder train
  ...

  # decoder train
  decoder_optimizer.zero_grad()

  target_tensor = pair[1]
  target_length = target_tensor.size(0)

  decoder_input = torch.tensor([[SOS_token]], device=device) # <sos> 토큰부터 시작
  decoder_hidden = encoder_hidden

  for di in range(target_length):
    decoder_output, decoder_hidden = decoder(decoder_input, decoder_hidden)
    loss += criterion(decoder_output, target_tensor[di])
    decoder_input = target_tensor[di]  # Teaching forcing: gt를 다음 input으로 넣는다

  loss.backward()

  encoder_optimizer.step()
  decoder_optimizer.step()

  return (loss.item() / target_length)
디코더의 경우 <sos> 토큰을 첫 입력으로 받아 문장을 출력합니다. 코드에서 decoder_hidden = encoder_hidden를 통해 인코더의 마지막 hidden state를 디코더가 hidden state로 전달 받는 것을 볼 수 있습니다.
위의 코드는 Teaching Force를 통해 모델을 학습하는데, 디코더의 다음 입력을 decoder_input = target_tensor[di]를 통해 결정하는 부분을 통해 살펴볼 수 있습니다.
이 상태에서 모델을 학습하면
HIDDEN_SIZE = 256
encoder = EncoderRNN(input_lang.n_words, HIDDEN_SIZE).to(device)
decoder = DecoderRNN(output_lang.n_words, HIDDEN_SIZE).to(device)

LEARNING_RATE = 0.01
encoder_optimizer = optim.SGD(encoder.parameters(), lr=LEARNING_RATE)
decoder_optimizer = optim.SGD(decoder.parameters(), lr=LEARNING_RATE)

criterion = nn.NLLLoss()

MAX_EPOCH = 40
train_loss_list = []

for epoch in range(1, MAX_EPOCH + 1):
  epoch_loss = 0
  tic = time.time()
  for pair in training_pairs:
    loss = train(encoder, decoder, encoder_optimizer, decoder_optimizer, criterion, pair)
    epoch_loss += loss

  avg_epoch_loss = epoch_loss / len(training_pairs)
  train_loss_list.append(avg_epoch_loss)
  toc = time.time()

  if epoch % 5 == 0:
    print(f'| epoch: {epoch:3d} | time: {toc - tic:5.1f} sec | loss: {avg_epoch_loss:8.4f}')
---------------------------------
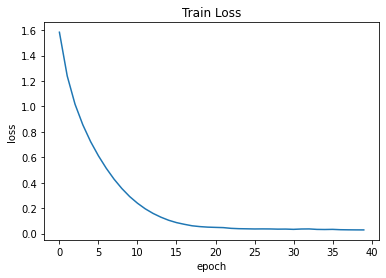
| epoch:   5 | time:  60.5 sec | loss:   0.6783
| epoch:  10 | time:  60.5 sec | loss:   0.2288
| epoch:  15 | time:  60.5 sec | loss:   0.0727
| epoch:  20 | time:  60.6 sec | loss:   0.0375
| epoch:  25 | time:  60.8 sec | loss:   0.0330
| epoch:  30 | time:  60.5 sec | loss:   0.0317
| epoch:  35 | time:  60.5 sec | loss:   0.0307
| epoch:  40 | time:  61.2 sec | loss:   0.0265
번역 결과를 평가해보자면…
# evaluate
def translateSentence(encoder, decoder, sentence):
  # encoder
  encoder.eval()
  input_tensor = sentenceToTensor(input_lang, sentence)
  input_length = input_tensor.size()[0]
  encoder_hidden = encoder.initHidden()

  encoder_outputs = torch.zeros(MAX_LENGTH, encoder.hidden_size, device=device)

  for ei in range(input_length):
    encoder_output, encoder_hidden = encoder(input_tensor[ei], encoder_hidden)
    encoder_outputs[ei] += encoder_output[0, 0]

  # decoder
  decoder.eval()
  decoder_hidden = encoder_hidden
  decoder_input = torch.tensor([[SOS_token]], device=device)
  decoded_words = []

  for di in range(MAX_LENGTH):
    decoder_output, decoder_hidden = decoder(decoder_input, decoder_hidden)
    topv, topi = decoder_output.topk(1)
    decoder_input = topi.squeeze().detach()

    if topi.item() == EOS_token:
      decoded_words.append('<eos>')
      break
    else:
      decoded_words.append(output_lang.index2word[topi.item()])

  return decoded_words

for _ in range(10):
  random_index = random.choice(lines.index)
  input_sentence = lines.loc[random_index, 'src']
  target_sentence = lines.loc[random_index, 'tar']
  output_sentence = ' '.join(translateSentence(encoder, decoder, input_sentence))

  input_sentence = input_sentence.replace('<eos>', '').replace('<sos>', '')
  target_sentence = target_sentence.replace('<eos>', '').replace('<sos>', '')
  output_sentence = output_sentence.replace('<eos>', '').replace('<sos>', '')

  print(f'eng: {input_sentence}')
  print(f'fra(gt): {target_sentence}')
  print(f'fra(pred): {output_sentence}')
  print('-' * 50)
eng: vous etes tres intelligente .
fra(gt):  you re very intelligent .
fra(pred):  you re very sophisticated .
--------------------------------------------------
eng: je suis fou de vous .
fra(gt):  i m crazy about you .
fra(pred):  i m crazy about you .
--------------------------------------------------
eng: tu es tres talentueux .
fra(gt):  you re very talented .
fra(pred):  you re very understanding .
--------------------------------------------------
eng: nous sommes satisfaites .
fra(gt):  we re satisfied .
fra(pred):  we re satisfied with that .
--------------------------------------------------
eng: je suis bon en ski .
fra(gt):  i m good at skiing .
fra(pred):  i m good .
--------------------------------------------------
번역 결고를 보면 제대로 번역된 문장도 있고, 완전히 제멋대로 번역해버린 문장도 있습니다. 또는 we're satisfied.를 we're satistied with that.과 같이 의미를 덧붙이거나 I'm good at skiing.을 I'm good.으로 의미를 누락한 경우도 있습니다.
혼합 학습
이번에는 Teaching Force와 모델 출력으로 학습으로 사용하는 것을 섞어서 학습해봅시다.
teacher_forcing_ratio = 0.5

def trainWithRandomTeachingForce(encoder, decoder, encoder_optimizer, decoder_optimizer, criterion, pair):
  # encoder train
  ...

  # decoder train
  ...

  use_teacher_forcing = True if random.random() < teacher_forcing_ratio else False

  if use_teacher_forcing:
    for di in range(target_length):
      decoder_output, decoder_hidden = decoder(decoder_input, decoder_hidden)
      loss += criterion(decoder_output, target_tensor[di])
      decoder_input = target_tensor[di]  # Teacher forcing: gt를 다음 input으로 넣는다
  else:
    for di in range(target_length):
      decoder_output, decoder_hidden = decoder(decoder_input, decoder_hidden)
      loss += criterion(decoder_output, target_tensor[di])
      topv, topi = decoder_output.topk(1)
      decoder_input = topi.squeeze().detach()  # Teacher forcing: gt를 다음 input으로 넣는다

  ...
teaching_forcce = 0.5를 도입해 절반씩 Teaching Force와 모델 출력 값으로 학습하도록 했습니다.
| epoch:   5 | time:  61.6 sec | loss:   0.7926
| epoch:  10 | time:  62.1 sec | loss:   0.2586
| epoch:  15 | time:  61.6 sec | loss:   0.0792
| epoch:  20 | time:  61.4 sec | loss:   0.0390
| epoch:  25 | time:  61.7 sec | loss:   0.0359
| epoch:  30 | time:  62.3 sec | loss:   0.0372
| epoch:  35 | time:  62.3 sec | loss:   0.0343
| epoch:  40 | time:  62.0 sec | loss:   0.0347
eng: je fais de mon mieux .
fra(gt):  i am doing my best .
fra(pred):  i am doing my best .
--------------------------------------------------
eng: vous etes vraiment embetant .
fra(gt):  you re really annoying .
fra(pred):  you re really annoying .
--------------------------------------------------
eng: ils ont tous disparu .
fra(gt):  they re all gone .
fra(pred):  they re all working together .
--------------------------------------------------
eng: je suis un artiste .
fra(gt):  i m an artist .
fra(pred):  i am an artist artist .
--------------------------------------------------
eng: il est constamment insatisfait .
fra(gt):  he s always dissatisfied .
fra(pred):  he s always dissatisfied .
--------------------------------------------------
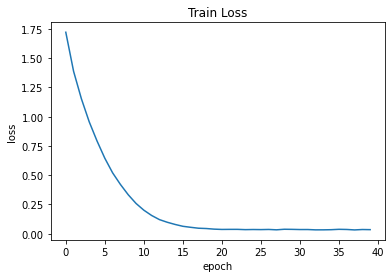
Teaching Force만을 사용했을 때에 비해 loss는 조금 늘었지만, 번역 품질은 비슷비슷합니다.
Attenion
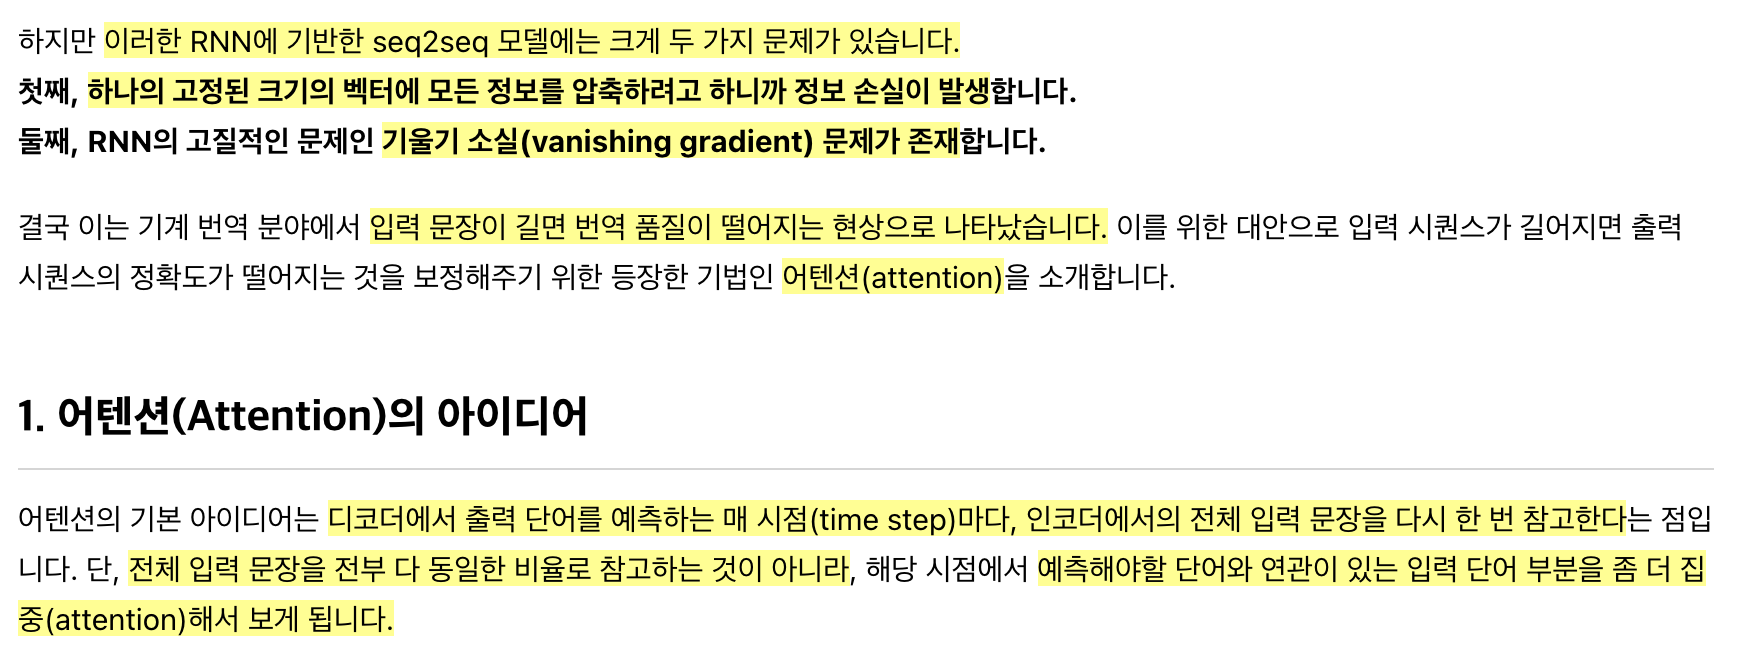
2개의 WordRNN을 인코더, 디코더로 사용한 seq2seq 모델은 2가지 단점이 있습니다.
- 문장을 하나의 고정된 길이의 context vector에 인코딩 하려고 하니 정보의 손실이 발생한다.
- RNN의 기울기 소실(gradient vanishing) 문제
Attention은 길이가 긴 문장도 효과적으로 번역하기 위해 제시되었습니다. Attention을 적용하면 디코더 단에서 출력하기 전에 전체 입력 문장을 한번 더 참고하게 됩니다. context vector 하나만 이용하는 것에 비하면 전체 입력 문장을 한번 더 볼 수 있는게 당연히 더 이득이라고 생각됩니다. Attention은 어떻게 입력 문장을 한번 더 참고할까요? Attention은 단순히 입력 문장 전체를 보는게 아니라 ‘현재 출력’과 ‘관련 있어 보이는’ 시점의 입력 부분을 더 참고합니다.
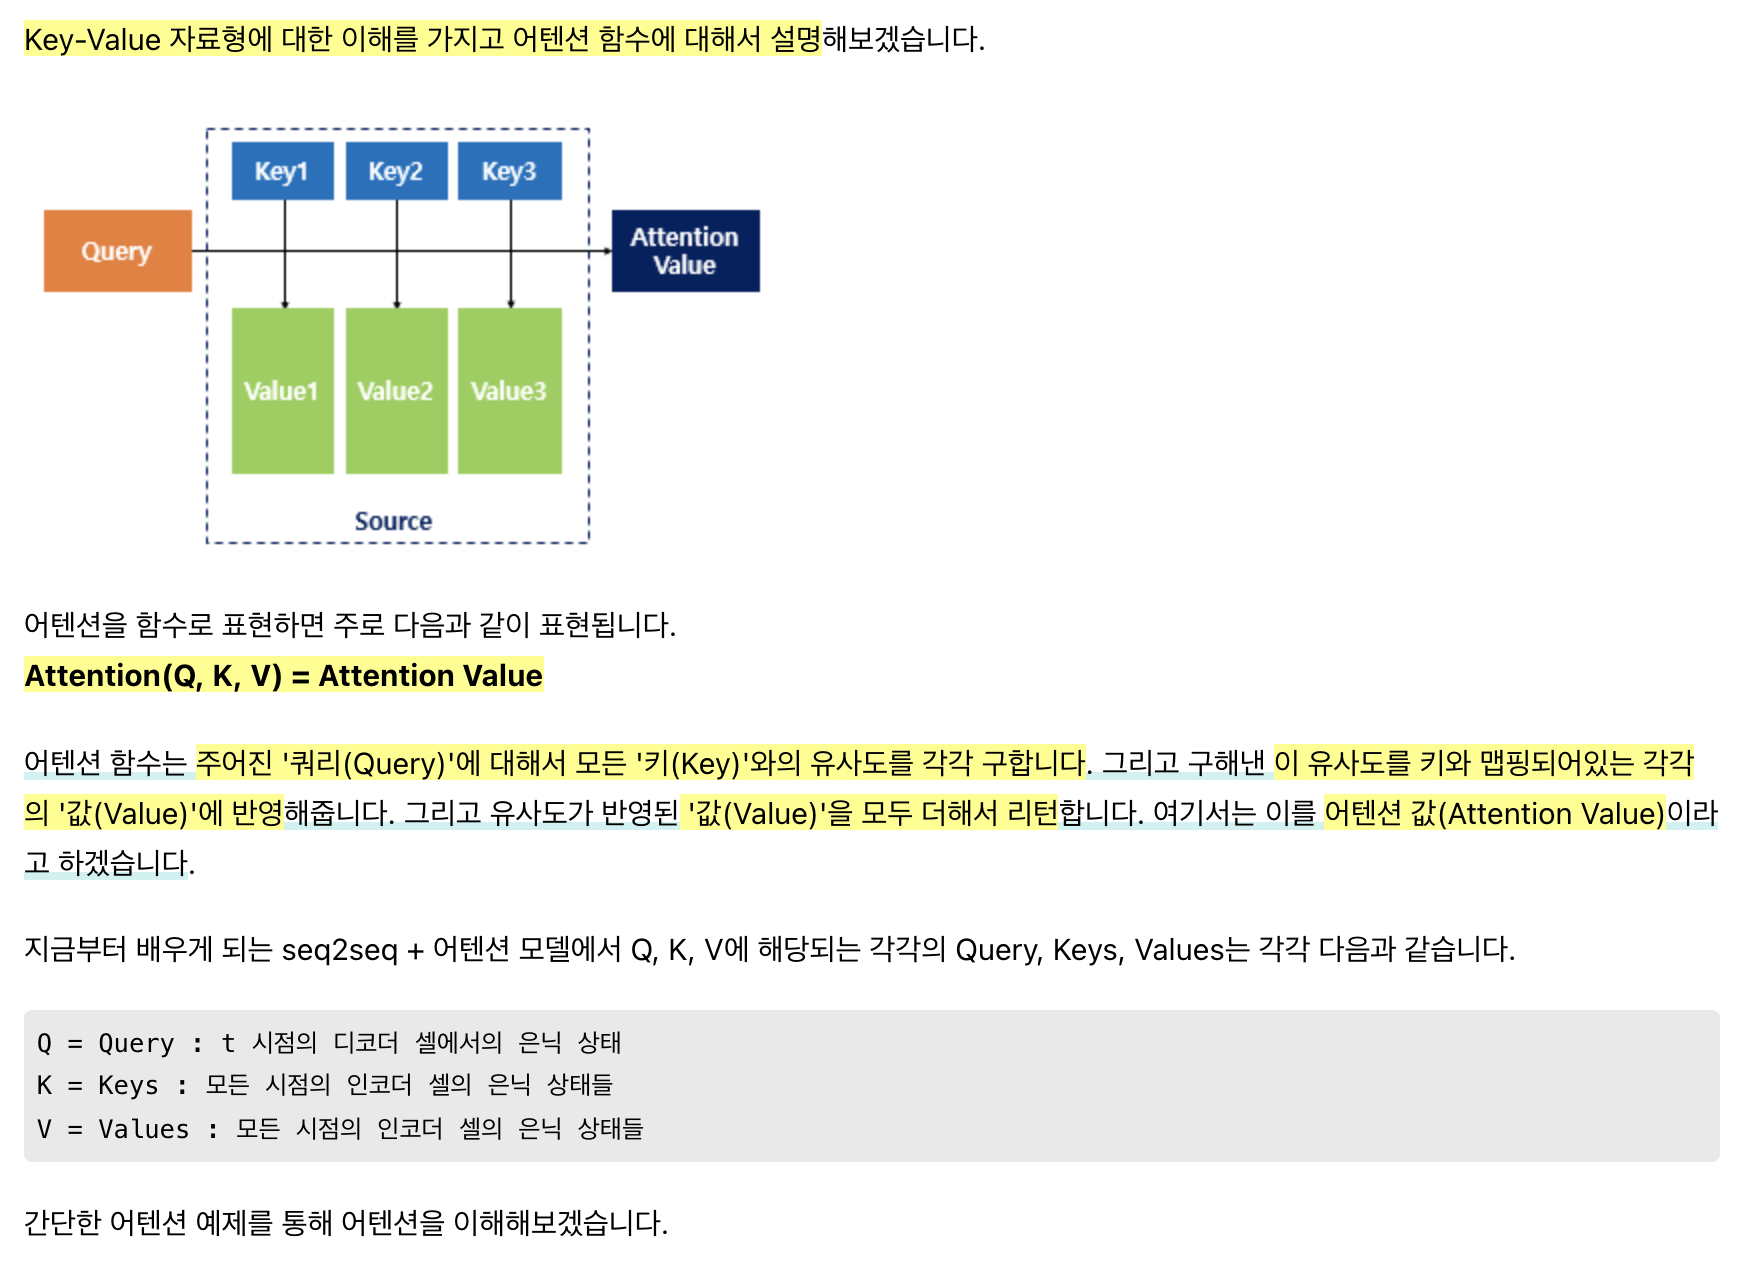
Attention의 핵심 콘셉트는 유사도(similarity)를 구하는 것입니다. 현재의 디코더 단에서 현재 시점의 은닉 상태를 쿼리(Query)로 삼아, 어떤 인코더 셀의 은닉 상태들(Keys)과 가장 유사했는지 유사도(Values)를 구한 후, 이를 종합한 최종적인 Attention Value를 리턴하는 구조 입니다.

매 시점에서 디코더의 RNN 셀은 output tensor와 hidden tensor를 출력합니다. 이때, 매 시점에서 hidden tensor를 이전 인코더에서의 hidden state들과 유사한 정도를 구합니다. 우리가 살펴볼 방식은 두 벡터의 내적(dot-product)으로 유사도를 구하는 Dot-Product Attention 입니다.
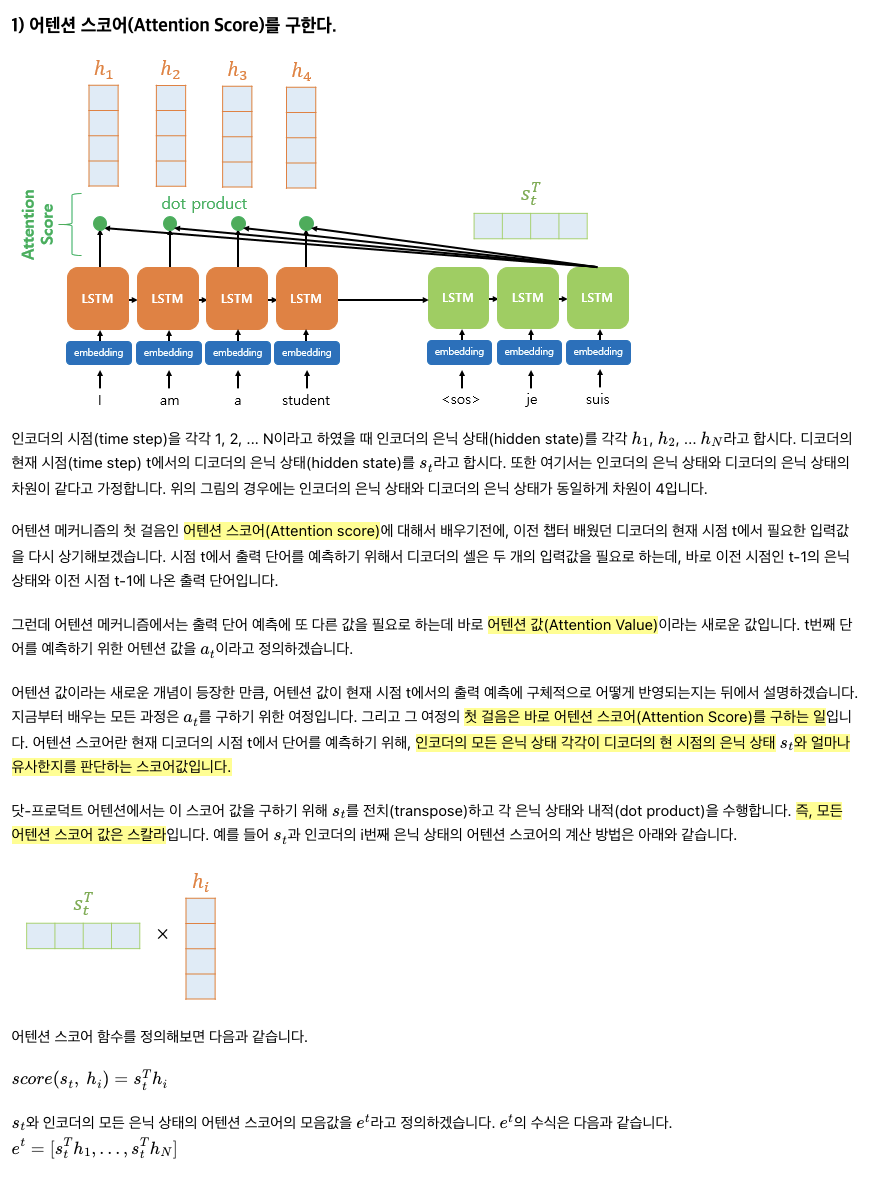
Attention Score = 디코더의 현재 은닉 상태와 인코더의 은닉 상태 각각이 얼마나 유사한지에 대한 값, 스칼라 값임.
Attention Score는 두 벡터의 유사도를 구하는 테크닉을 사용해 계산하면 됩니다. 참고 자료에서는 dot-product로 유사도를 계산했습니다.
** 세미나 내용과는 좀 먼 내용이지만… 일반적으로 유사도(similarity)와 거리(distance)는 반비례 하기 때문에 거리(distance)를 구하는 여러 테크닉들을 알아두면 좋습니다. [참고자료: Metric Learning]
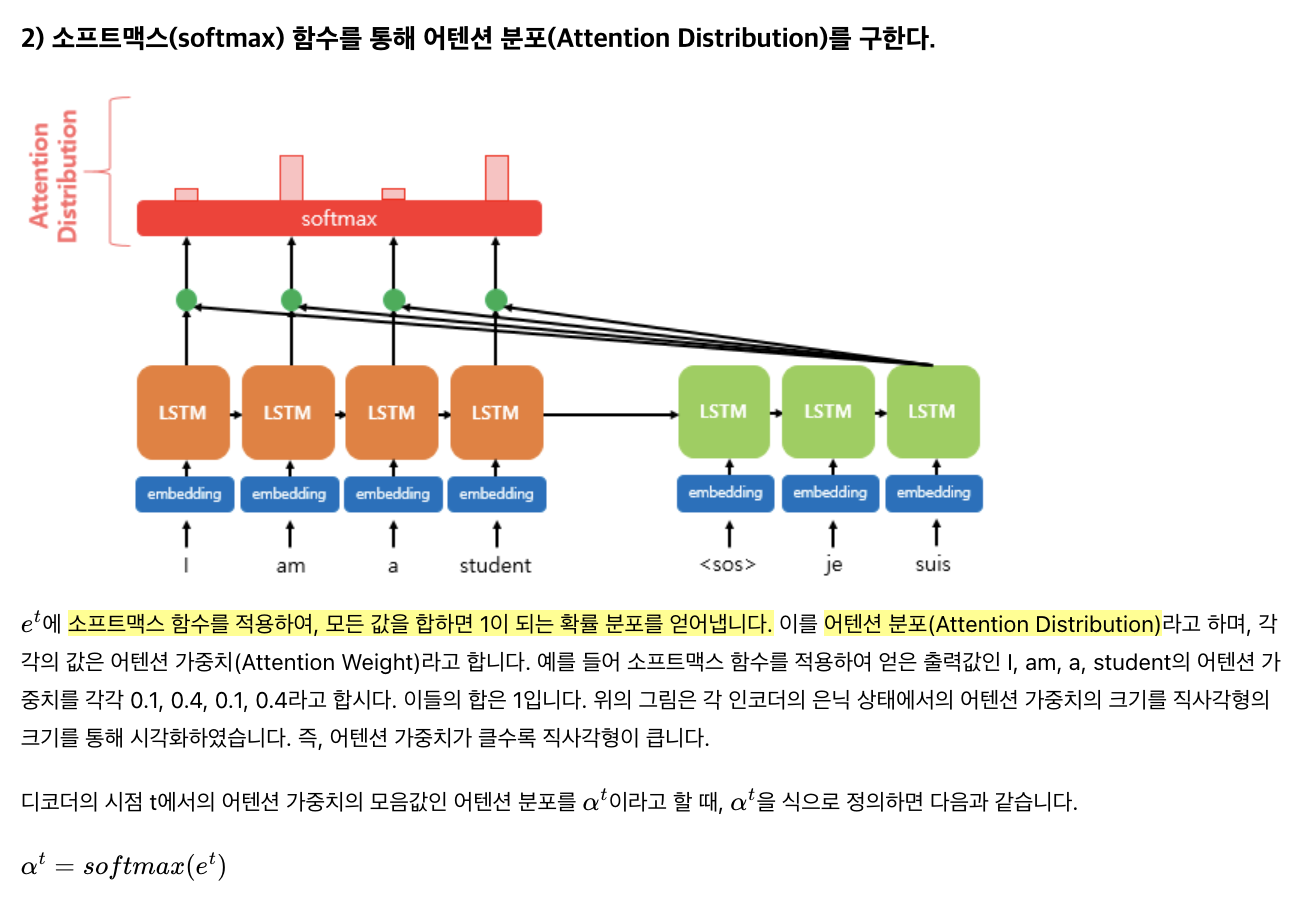
유사도를 의미하는 Attention Score를 정규화하기 위해 Softmax 함수를 사용합니다. 이 결과를 Attention Distribution이라고 합니다.
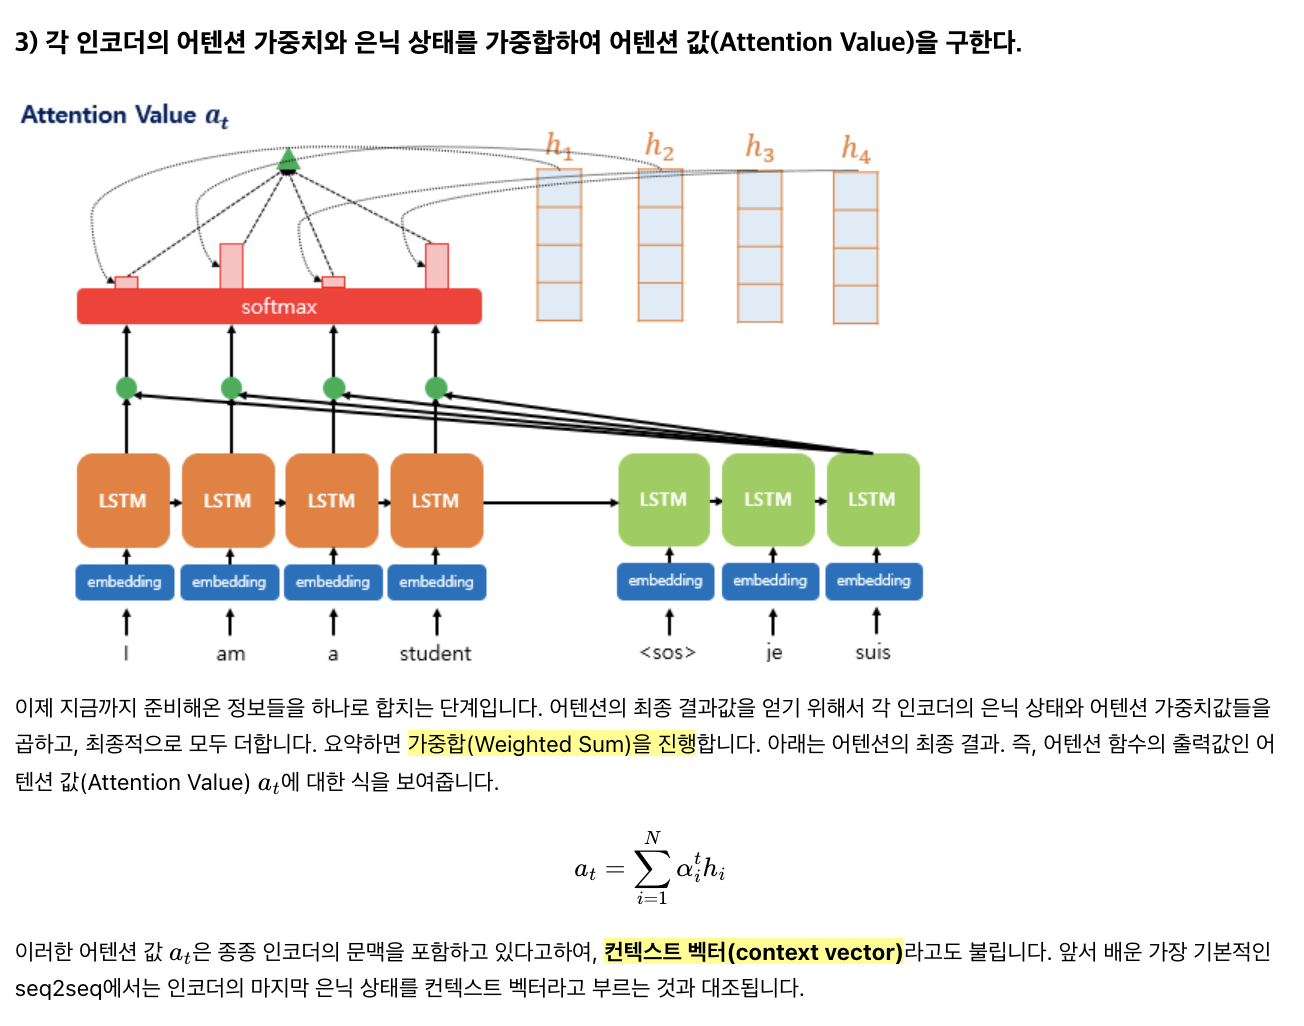
이제 구한 Attention Distribution을 가중치 삼아 인코더의 각 은닉 상태를 가중합하여 하나의 Attention Value를 생성합니다. 단, Attention ‘Value’는 인코더 은닉 상태와 동일한 크기의 ‘벡터’임에 유의.
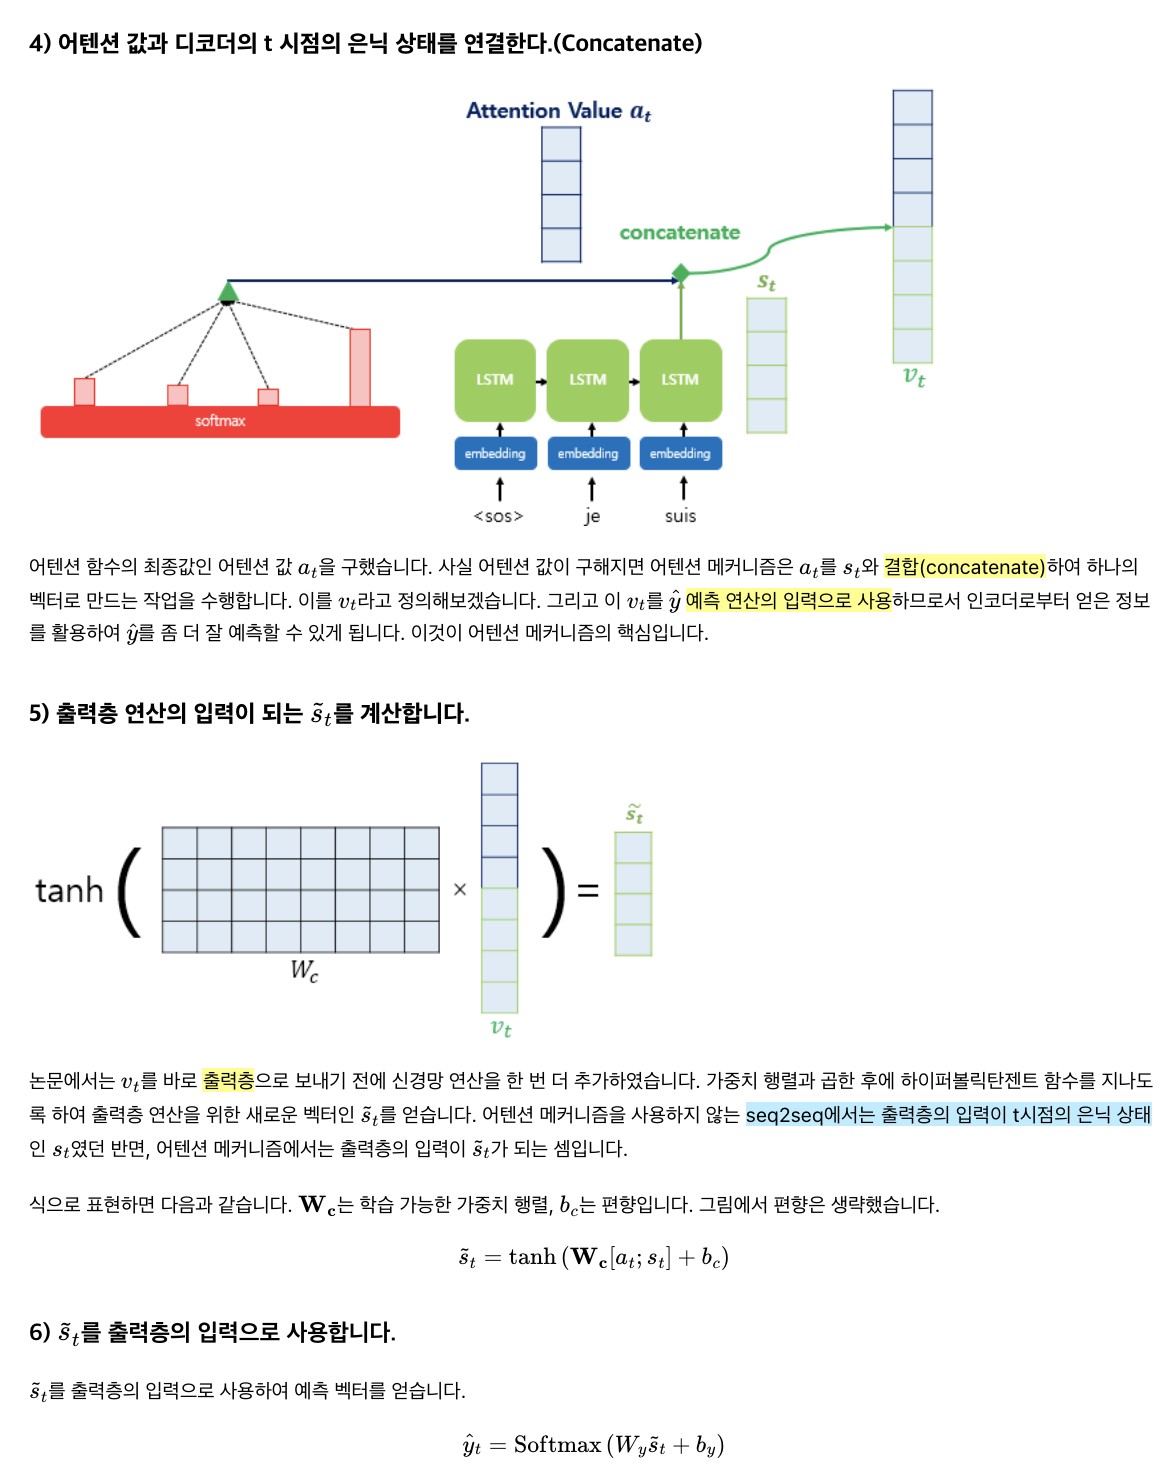
Attention Value를 구했다면 기존 디코더의 output tensor에 concat하여 출력층의 입력으로 사용한다. 이때 따라 출력층의 입력은 기존 len(output_tensor)에서 2 x len(output_tensor)가 된다.
구현
Attention 모델 정의
인코더는 그대로 사용하고, 디코더 부분만 Attention을 추가해서 구현하면 된다.
class AttnDecoderRNN(nn.Module):
  def __init__(self, output_size, hidden_size):
    super(AttnDecoderRNN, self).__init__()
    self.embbed_size = hidden_size # same as hidden size
    self.hidden_size = hidden_size
    self.output_size = output_size # of words in output language

    self.embedding = nn.Embedding(self.output_size, self.embbed_size)
    self.gru = nn.GRU(self.embbed_size, self.hidden_size)

    # attention
    self.attn = nn.Linear(self.hidden_size * 2, self.hidden_size)

    self.fc = nn.Linear(hidden_size, output_size)
    self.softmax = nn.LogSoftmax(dim = 1)

  def forward(self, input, hidden, encoder_outputs):
    embedded = self.embedding(input).view(1, 1, -1)
    embedded = F.relu(embedded)

    output, hidden = self.gru(embedded, hidden)

    # attention
    attn_score = encoder_outputs.matmul(hidden.view((self.hidden_size, 1)))
    attn_distribution = F.softmax(attn_score, dim = 0)
    attn_value = torch.sum(encoder_outputs * attn_distribution, dim = 0).view(1, 1, self.hidden_size) # 가중합

    concat = torch.cat((attn_value, hidden), dim = 2)
    output = self.attn(concat)
    output = torch.tanh(output)

    output = self.fc(output[0])
    output = self.softmax(output)

    return output, hidden

  def initHidden(self):
    return torch.zeros(1, 1, self.hidden_size, device=device)
초반의 embedding과 RNN 부분까지는 기존 디코더와 동일하지만, 출력층 계산을 하기 전에 Attention Value를 구한다.
  def forward(self, input, hidden, encoder_outputs):
    ...
    # attention
    attn_score = encoder_outputs.matmul(hidden.view((self.hidden_size, 1)))
    attn_distribution = F.softmax(attn_score, dim = 0)
    attn_value = torch.sum(encoder_outputs * attn_distribution, dim = 0).view(1, 1, self.hidden_size) # 가중합
    ...
Attention 과정에 인코더의 출력(인코더 hidden state 대신 인코더 output state를 쓰기도 하는 것 같다)이 필요하므로 forward() 인자로 encoder_ouputs가 추가되었다. encoder_outputs와 현재의 hidden state를 곱해 attn_score를 구한다. 이어 F.sotfmax()로 attn_distribution을 구한 후, 가중합을 통해 attn_value를 구한다.
이어지는 부분은 기존 디코더의 동일하게 출력층에 대한 부분이며, 본 모델의 경우 Attention Concat 이후에 한번의 nn.Linear를 추가로 수행했다.
  def __init__(...):
    ...
    # attention
    self.attn = nn.Linear(self.hidden_size * 2, self.hidden_size)
    ...

  def foward(...):
    ...
    concat = torch.cat((attn_value, hidden), dim = 2)
    output = self.attn(concat) # 한번 더 nn.Linear
    output = torch.tanh(output)

    output = self.fc(output[0])
    output = self.softmax(output)
    ...
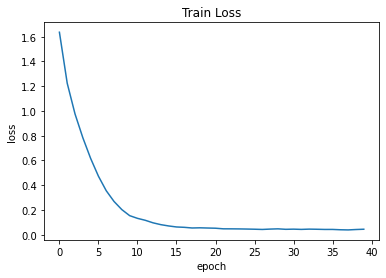
모델 학습과 학습 결과
학습 코드는 기존과 동일한데, forward() 부분에 encoder_outputs만 추가해주면 된다. 그 부분 하나만 달라서 학습 코드는 생략하겠다.
| epoch:   5 | time:  96.0 sec | loss:   0.6167
| epoch:  10 | time:  95.6 sec | loss:   0.1541
| epoch:  15 | time:  95.5 sec | loss:   0.0708
| epoch:  20 | time:  95.6 sec | loss:   0.0541
| epoch:  25 | time:  95.0 sec | loss:   0.0458
| epoch:  30 | time:  94.1 sec | loss:   0.0436
| epoch:  35 | time:  94.1 sec | loss:   0.0426
| epoch:  40 | time:  94.1 sec | loss:   0.0444
eng: nous sommes bourrees .
fra(gt):  we re smashed .
fra(pred):  we re plastered .
--------------------------------------------------
eng: vous etes tres contrariees .
fra(gt):  you re very upset .
fra(pred):  you re very skeptical .
--------------------------------------------------
eng: vous etes branchees .
fra(gt):  you re fashionable .
fra(pred):  you re fashionable .
--------------------------------------------------
eng: c est mon meilleur ami .
fra(gt):  he is my best friend .
fra(pred):  he is my best friend .
--------------------------------------------------
eng: tu es tatillon .
fra(gt):  you re finicky .
fra(pred):  you re fussy .
--------------------------------------------------
본인의 경우 Attention 모델의 loss가 seq2seq 보다 높게 나왔다. 그러나 기계 번역, 그리고 번역 이라는 것이 정확히 1대1로 대응되는 것이 아니고, 우리가 학습한 데이터셋에서도 동일한 입력 문장에 출력이 여러 개인 케이스가 몇몇 있기 때문에 loss 하나만으로 성능을 평가하긴 어렵다.
이전 모델과 마찬가지로 몇몇 문장은 정확히 번역 하는 반면, 몇몇 단어는 그렇지 않다. seq2seq, Attention 모델 모두 처음의 “주어 + be 동사”까지는 거의 정확히 번역하는 걸 볼 수 있다.
맺음말
이번 세미나에서는 seq2seq와 Attention 모델에 대해 살펴보았다. Attention 모델은 NLP 뿐만 아니라 Computer Vision, Graph Neural Net 등에서도 활용하기 때문에 꼭 알아야 하는 딥러닝 개념 중 하나다. 다음 세미나에서는 Attention에서 발전된 Transformer에 대해 살펴보겠다.